Transforming Narrow Fabric: The Ultimate DIY Tablecloth Guide
Embark on a creative journey today as we unveil the secrets to crafting a stunning DIY tablecloth, even when faced with seemingly impossible narrow fabric! This comprehensive guide will walk you through essential sewing techniques: mastering the robust and tidy fell seam for joining fabric panels, and effortlessly creating a beautifully curved hem using single-fold bias tape. Prepare to transform ordinary fabric into a personalized masterpiece that elevates your home decor.
Now, before we dive into the stitches and seams, I must share a little secret – this project holds a special, somewhat humorous origin story. Years ago, I stumbled upon a clearance bin brimming with this absolutely hilarious cowboy fabric. The vibrant colors immediately caught my eye, and the irresistible sale price sealed the deal. But the true gem was the uncanny resemblance of the biggest cowboy, hat in the air, to my dear father-in-law. I’m still not sure if he’d find it as amusing as I do (likely not!), but the sheer hilarity of it compelled me to buy several meters. For years, this delightful fabric sat patiently, awaiting its destiny. Its fate, it seems, was to become a vibrant, protective, and decidedly unique tablecloth.
Why Embrace the Art of DIY Tablecloths?
Beyond the sheer satisfaction of creating something with your own hands, crafting a DIY tablecloth offers numerous practical benefits. For one, it provides an unparalleled opportunity to inject your personal style and creativity into your home decor. You’re no longer limited by the designs, sizes, or fabric choices available in stores. Imagine a tablecloth perfectly matched to your existing dinnerware, or a seasonal design that brings festive cheer to your dining space.
More importantly, tablecloths serve as vital protectors for your valuable furniture. I, for one, have learned this lesson the hard way. Our teak table, with its softer, more delicate wood, has suffered one too many accidental drink rings or minor scratches despite the use of placemats. There’s nothing quite like the mild panic of seeing a damp glass set down directly onto the beautiful wood. Tablecloths act as a beautiful barrier, safeguarding your table from spills, heat, and scratches, ensuring its longevity and pristine appearance. Especially when entertaining guests, a well-placed tablecloth becomes your best friend, allowing everyone to relax and enjoy the meal without worrying about minor mishaps.
The challenge, however, often arises when your chosen fabric is simply too narrow to achieve the desired tablecloth dimensions with a simple hem. This was precisely the predicament with my beloved cowboy fabric. It was beautiful, but frustratingly short on width. This common dilemma calls for a clever solution – piecing the fabric together. This guide will show you how to do just that, creating a seamless and professional-looking tablecloth that belies its humble origins. Let’s transform that narrow fabric into a wide, wonderful statement piece!
Cutting Out & Piecing Together Your Fabric
The first step in tackling narrow fabric is strategic cutting and piecing. When your fabric isn’t wide enough, the most straightforward approach is to join multiple panels. For our round tablecloth, my Mom and I opted to cut the fabric into four equal quarters. This allowed us to achieve the necessary width while also introducing an interesting dynamic with the fabric pattern. Depending on your fabric’s design, you might need to consider how the pattern will align or change direction when pieced together. In our case, the whimsical cowboy pattern lent itself well to a directional change, adding to its quirky charm.
After carefully cutting the fabric into four distinct sections, we began the assembly process. We took two quarters and sewed them together along one long edge, effectively creating one half of the tablecloth. This process was then repeated with the remaining two quarters to form the second half. Finally, these two larger halves were sewn together down the middle, transforming four narrow pieces into one substantial and wide fabric panel ready for hemming. This method is incredibly versatile and can be adapted for rectangular or square tablecloths by simply adjusting the number and dimensions of your fabric panels.
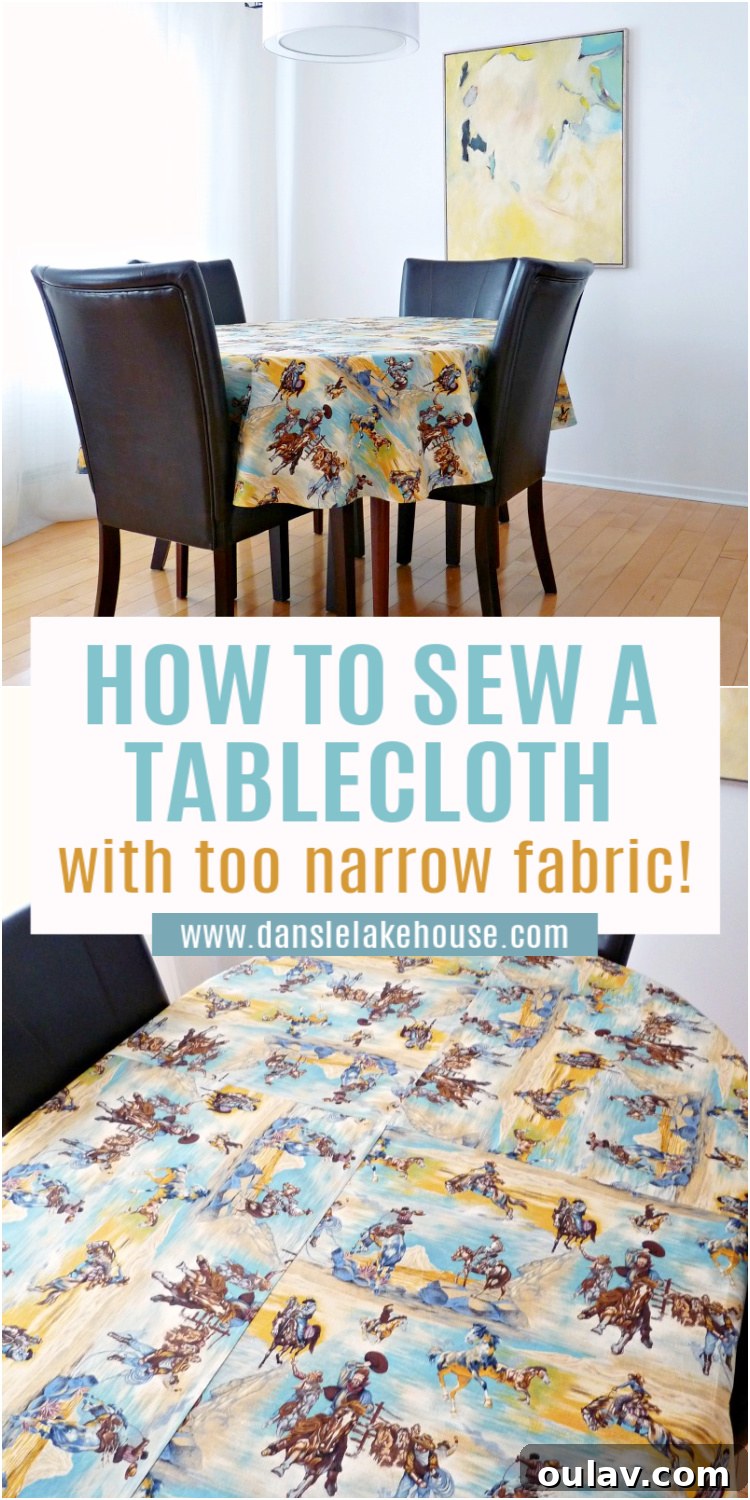
Before proceeding, it’s always helpful to visualize the final outcome. Here’s a sneak peek at the finished product, offering a sense of the pattern orientation after piecing. Remember, the beauty of DIY is that you can arrange your fabric pattern in any way that inspires you and best suits your aesthetic vision:
Mastering the Fell Seam for a Professional Finish
For joining the fabric panels, we opted for a fell seam, also known as a flat-felled seam. This particular seam choice wasn’t arbitrary; it’s a testament to durability and a clean finish. Unlike a standard seam allowance which can leave raw edges or bulk on the underside, a fell seam completely encloses all raw edges within the seam itself. This results in a super neat, strong, and professional finish that is incredibly resistant to fraying and stress. When you look underneath the finished tablecloth, there’s no mess of threads or exposed fabric – just a smooth, flat seam. It’s the same type of seam you’d typically find on the outside of your favorite jeans, a testament to its strength and neatness. This makes it ideal for items that will see frequent washing and use, like a tablecloth.
Step-by-Step Guide to Crafting a Fell Seam
- Prepare Your Fabric & Sew First Seam: Align two pieces of fabric right sides together, ensuring any patterns are matched if necessary. Sew them together with a generous seam allowance, typically around 5/8 inch (1.5 cm) or even 3/4 inch (2 cm) if you’re new to this seam. The generosity allows for ample fabric to fold and enclose the raw edges. Press the seam open initially to set the stitches.
- Trim One Seam Allowance: Carefully trim *one layer* of the seam allowance down to about 1/4 inch (0.6 cm) from the stitched line. It’s crucial to trim only one side, leaving the other side wider. This creates the staggered layers needed for the neat fold.
- Position for Folding: The fabric should now show one wider seam allowance and one trimmed, narrower seam allowance. The appearance at this stage will resemble the illustrative photos often labeled “3” in sewing diagrams, clearly showing the length difference.
- Fold the Longer Side: Take the longer, untrimmed seam allowance and fold its raw edge in half, pressing it towards the trimmed edge. This fold will encapsulate the raw edge of the longer allowance.
- Enclose the Trimmed Edge: Now, take this newly folded edge and bring it over to completely cover the trimmed seam allowance. The folded edge should neatly encase the shorter, trimmed edge, hiding both raw edges within the fold. Press this fold firmly in place.
- Flatten and Secure: Once the folded edge has covered the trimmed edge, iron the entire seam flat against the main fabric. Ensure the seam lies smoothly and creates a clean, flat line on the right side of your fabric. Pin generously if needed to hold it in place.
- Stitch It Down: Finally, sew the folded edge flat onto the fabric with a straight stitch, very close to the folded edge (an “edge stitch”). This second line of stitching secures the fell seam, making it incredibly durable and giving it that signature double-stitched appearance.
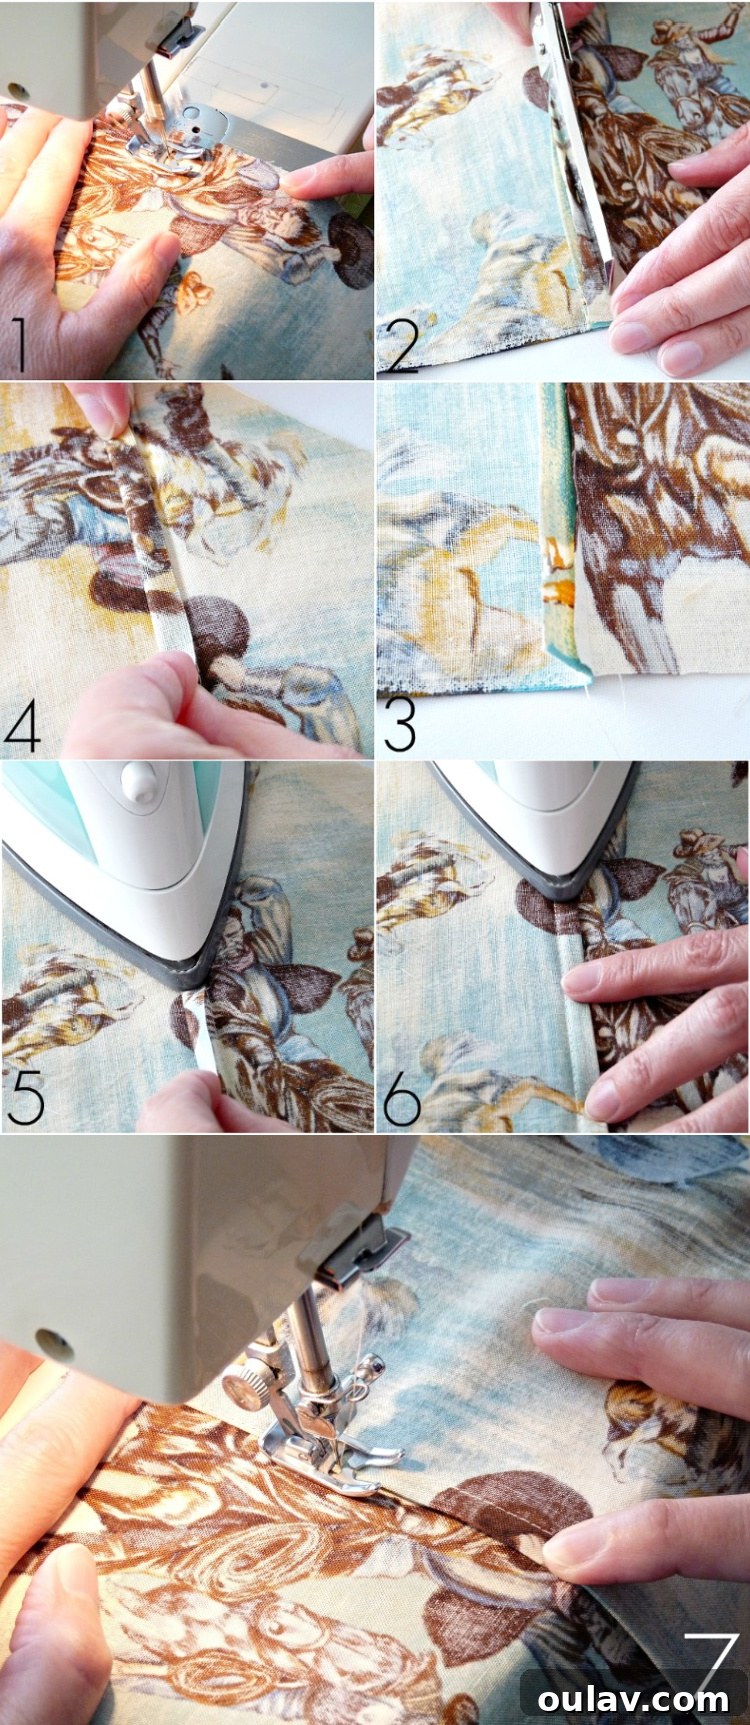
When executed correctly, the fell seam transforms raw edges into a smooth, decorative, and incredibly strong join, making it perfect for the center seam of your new DIY tablecloth. It provides a polished finish both aesthetically and structurally, ensuring your tablecloth stands the test of time and countless washes.
Flawless Curves: Hemming with Single Fold Bias Tape
Once your fabric panels are expertly joined, the next crucial step is hemming the edges. While straight edges can be handled with a simple double-fold hem (and for square or rectangular tablecloths, you can explore techniques like a mitered corner tutorial for crisp, clean corners), hemming a curved edge presents a unique challenge. This is where bias tape truly shines. Bias tape is fabric cut on the bias (diagonally across the grain), which gives it exceptional stretch and flexibility, allowing it to conform smoothly to curves without puckering or distorting the fabric. For our round tablecloth, single-fold bias tape was the perfect solution to achieve a beautifully neat and flowing hem.
Before you begin, a quick tip: bias tape, especially when purchased pre-packaged, often comes with kinks and creases from storage. A good press with an iron will make it much more manageable and ensure a smoother application. Ironing out these imperfections will save you frustration and lead to a much more professional-looking finish.
Easy Steps to Hemming with Single Fold Bias Tape
- Attach to the Right Side: Take your single-fold bias tape and align one of its open, raw edges with the raw edge of your tablecloth fabric. Pin the bias tape to the *right side* of the tablecloth, following the curve meticulously. The fold of the bias tape should be facing inwards, away from the raw edge of the tablecloth.
- Sew in Place: Stitch the bias tape to the fabric along the fold closest to the raw edge. Use a consistent seam allowance, typically 1/4 inch (0.6 cm), or just inside the existing fold line of the bias tape. Go slowly around curves to ensure a smooth, even stitch.
- Inspect Your Work: After the initial stitch, take a moment to check your work. Ensure the bias tape is securely sewn down everywhere, without any puckering, stretching, or missed spots. A neat first pass is key to a beautiful final hem.
- Overlap Ends (if applicable): If you’re hemming a continuous curve like a circle, you’ll need to join the ends of the bias tape. Overlap the ends by about an inch (2.5 cm), trimming any excess, and secure them with a few stitches to create a seamless circle.
- Flip and Press: Now, flip the bias tape over to the *wrong side* of the fabric. This action is similar to how you’d form a regular hem. The bias tape will now encapsulate the raw edge of your tablecloth. Press the bias tape firmly in place, ensuring it lies flat and smooth along the curve. The natural flexibility of bias tape will allow it to conform beautifully.
- Final Topstitch: To secure the hem, sew the bias tape to the fabric from the right side, sewing close to the folded edge of the bias tape. This final line of stitching will hold the hem permanently in place, giving your curved edge a clean, finished, and durable look.
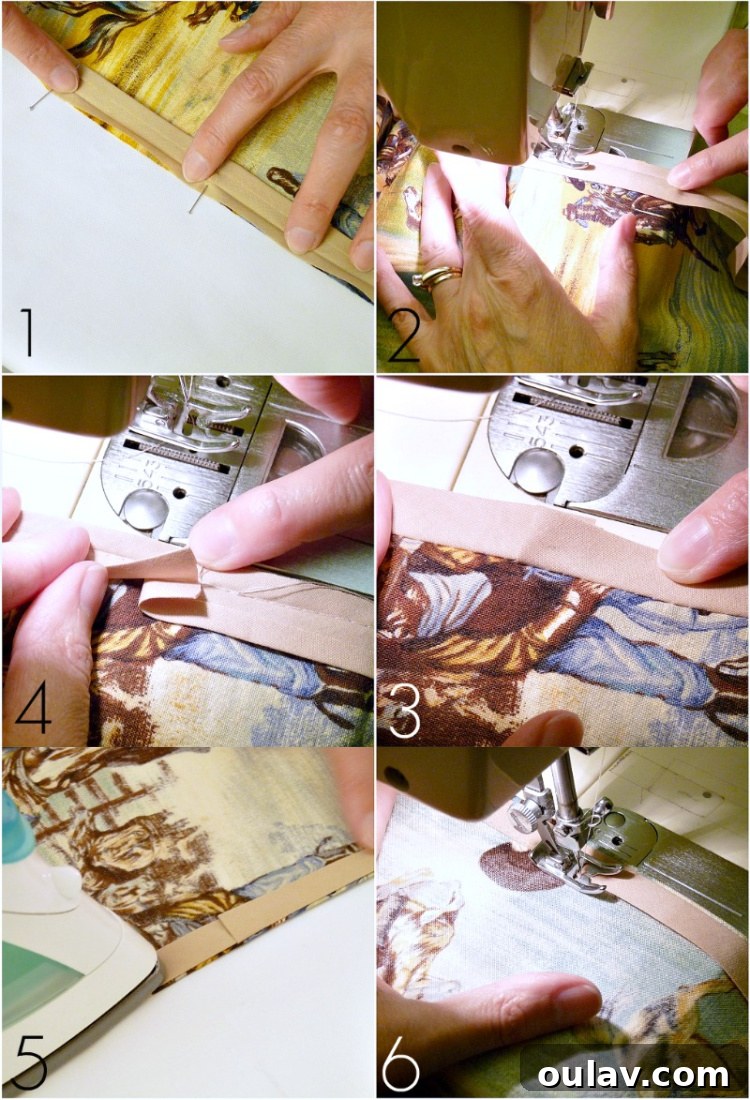
The result of this bias tape application is a perfectly finished, non-puckering curve that adds a professional touch to your handmade tablecloth. It’s a method that ensures both beauty and resilience, making your tablecloth ready for years of enjoyment.
Your Beautiful Handmade Tablecloth Revealed!
Presenting Your Finished DIY Tablecloth
And there you have it! Our unique cowboy fabric has been expertly transformed into a vibrant and functional tablecloth, ready to grace our dining table. The fell seams are neat and strong, the curved hem with bias tape is smooth and flawless, and the entire piece radiates a charm that only a handmade item can possess. It’s a testament to the fact that with a little ingenuity and the right sewing techniques, even challenging fabrics can be turned into something truly special.
Set and ready for a meal, this tablecloth looks absolutely adorable. The playful colors of the cowboy print, with its blues and browns, harmonize beautifully with my turquoise and green dinnerware pieces. It creates a lively and inviting atmosphere, perfect for casual family meals or entertaining friends. The joy of a DIY project extends beyond the creation; it’s in the everyday moments where your craftsmanship shines through.
We also have plans to sew some matching napkins using this handy tutorial to complete the set. But for now, these charming vintage yellow napkins with their delicate embroidered flowers provide a sweet contrast. They subtly tone down the inherent “cowboy-ness” of the fabric, though I confess, I’m not actually trying to make it more feminine. The proud feminist in me absolutely loves rocking a fabric that was probably originally designed for a little boy’s room, subverting expectations with every stitch!
And for those who appreciate practical tips and perhaps a touch of “old-lady wisdom,” here’s a secret I swear by for added table protection: I always place a vinyl table covering underneath the fabric tablecloth. This offers an extra layer of defense against major spills and general wear and tear, especially when dining with particularly messy eaters (you know who you are, lol!). For those truly chaotic meal times, sometimes the vinyl alone is all that makes an appearance!
Beyond the Basics: Tips for Tablecloth Care & Longevity
To ensure your beautiful handmade tablecloth serves you well for years to come, proper care is essential. Always check the washing instructions for your specific fabric choice before you begin sewing. Most cotton fabrics can be machine washed in cold water and tumble dried on low, but if you’ve chosen a delicate blend or one with special finishes, follow its unique care guide. For stubborn stains, address them promptly before they set. Pre-treating with a stain remover can work wonders. Regular washing will keep your tablecloth fresh and vibrant, ready for its next occasion. The durability of the fell seam and the secure bias tape hem mean it will stand up to repeated laundering, a testament to the quality of your work.
Unleash Your Inner Crafter: Final Thoughts
Creating your own DIY tablecloth from narrow fabric is more than just a sewing project; it’s an act of resourcefulness, creativity, and personal expression. It demonstrates that with a little patience and the right techniques, you can overcome common crafting challenges and produce stunning results. Whether you’re making a statement with a bold pattern like our cowboy fabric or opting for something subtle and elegant, the satisfaction of laying out a tablecloth you’ve made yourself is unparalleled. We hope this detailed guide empowers you to tackle your own narrow fabric dilemmas and infuse your home with beautiful, handmade textiles. Happy sewing!
Don’t Forget to Pin This Project for Later!