
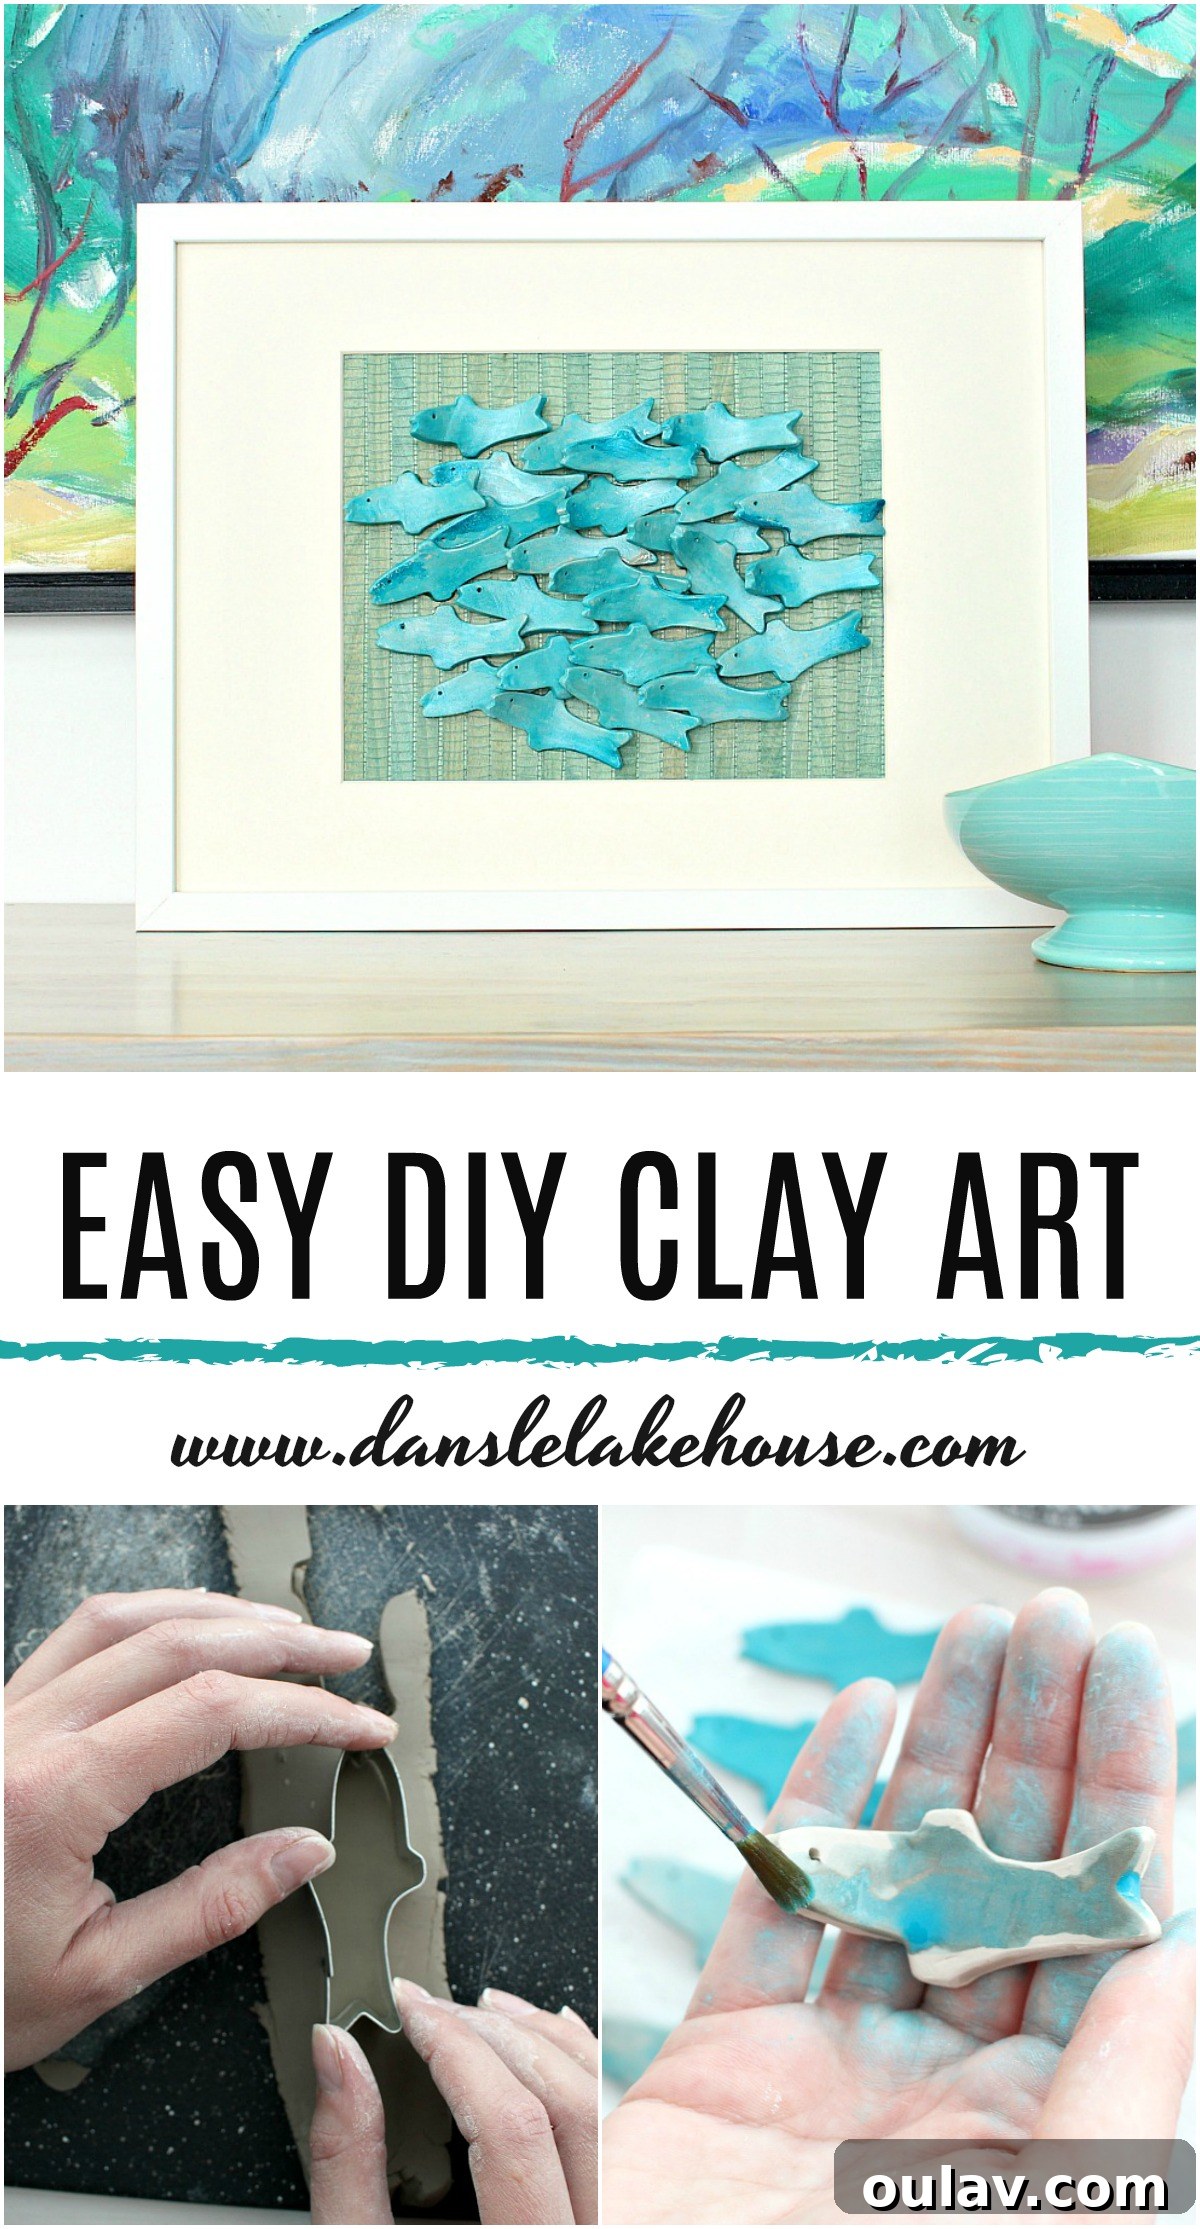
DIY Air Dry Clay Fish Art: Dive into a Modern Coastal Craft Project
While my typical creative explorations often involve easy paint tutorials and canvas art, today we’re venturing into a different, yet equally accessible, artistic medium: air dry clay. This delightful material opens up a world of possibilities for sculptural art, and I’m thrilled to share an easy air dry clay craft project that results in stunning, three-dimensional fish art. Imagine a vibrant school of fish, seemingly ready to leap from their frame, bringing a refreshing modern coastal vibe to your space. Working with clay, especially air dry varieties, proved to be an incredibly fun and rewarding experience, offering a tactile and meditative escape from the everyday.
My journey into the world of clay crafting began many years ago when I impulsively purchased a package of air dry clay. It sat patiently in my craft stash, an unexplored realm of creativity, while I diligently curated a Pinterest board brimming with inspiring clay and pottery ideas. Yet, the perfect project remained elusive, waiting for its moment to inspire action. That moment finally arrived when I stumbled upon this truly breathtaking ceramic artwork. Its elegant simplicity, dynamic form, and serene coastal aesthetic instantly captivated me, finally providing the spark needed to commit to creating my own DIY clay art. The beauty of this particular medium is its forgiving nature and the ability to achieve impressive, professional-looking results without the need for a kiln, making it ideal for home crafters and beginners alike.
While my humble DIY clay art project may not possess the sophisticated finesse or masterful craftsmanship of the original gorgeous ceramic piece that served as my muse, it nevertheless holds immense personal value and charm. The true joy of this endeavor stemmed from the peaceful and mindful process of bringing these clay fish to life. There’s something inherently therapeutic about working with your hands, shaping a raw material into something beautiful and meaningful. This project became a wonderful reminder that art doesn’t have to be perfect to be profoundly satisfying; the process itself can be a fulfilling reward.
Essential Supplies for Your DIY Clay Fish Art Project
Embarking on any DIY adventure often begins with gathering your tools and materials. In a fortunate turn of events, and continuing my recent commitment to crafting with existing supplies, I discovered I had everything necessary right on hand for this delightful air dry clay craft project. This detailed list provides all the items you’ll need to create your very own captivating school of sculptural fish, along with tips for selection.
- Air dry clay: The undisputed star of our show! Choose a good quality, pliable clay for best results. It’s remarkably versatile, easy to work with, and requires no baking or special equipment like a kiln.
- Rolling pin: Essential for achieving an even thickness for your clay pieces, ensuring they dry uniformly and have consistent durability. A regular kitchen rolling pin works perfectly.
- Cutting board or non-stick mat: Provides a clean, flat, and non-stick surface to work on, preventing the clay from adhering while you roll and cut.
- Shimmering acrylic paint: I opted for Artist’s Loft Metallic Cobalt Blue, a beautiful shade that perfectly captured the aquatic theme. Metallic, pearlescent, or even iridescent paints add a captivating sheen that mimics fish scales.
- Small plastic container with water: An indispensable tool for smoothing edges, adding moisture to your clay, and cleaning brushes.
- Small paint brush: For applying your chosen paint colors. A fine-tipped brush is excellent for detailed work, while a broader, softer brush can create washes.
- Fish shaped cookie cutter: The quickest and most consistent way to create uniform fish shapes. However, feel free to freehand cut shapes or use other animal cutters to personalize your school!
- Fine grit sandpaper: For gently smoothing any rough edges or imperfections after the clay has dried, ensuring a refined and pleasant-to-touch finish.
- Toothpick or skewer: Ideal for adding small, intricate details like eyes, gills, or scale patterns, and for creating textured surfaces.
- Paper towels: Always handy for cleaning up messes, drying brushes, and blotting excess water or paint.
- Textured wallpaper sample or scrapbook paper: This will form the dynamic background of your artwork, adding depth, color, and visual interest. Look for patterns or textures that complement your coastal or desired theme.
- Cardboard: Provides a sturdy backing for your chosen paper and the overall art piece, ensuring structural integrity.
- Epoxy (5-minute variety recommended): A strong, fast-setting adhesive crucial for securely attaching your clay fish to the background, creating a lasting display.
- Picture frame (without glass): To beautifully display your finished sculptural art. Choose a frame that matches your decor style and allows the 3D elements to stand out.
Step-by-Step Guide: Crafting Your Own DIY Clay Fish Art
Creating this sculptural fish art is a wonderfully engaging and satisfying process. Follow these detailed steps to transform simple air dry clay into a captivating, gallery-worthy piece of home decor. Each stage is designed to be straightforward and enjoyable, even for novice crafters.
1. Preparing and Cutting the Clay Shapes
The initial challenge I faced involved resurrecting my air dry clay, which had unfortunately solidified into a stubborn brick over the years. If your clay is fresh and pliable, you can happily skip this rehydration step! For hardened clay, I carefully made several punctures with a sharp knife to allow moisture to penetrate. Then, I poured about half a cup of water directly onto the clay and sealed it tightly in a plastic bag. After letting it sit for several hours (or even overnight for very hard clay), the clay miraculously rehydrated and became soft and pliable once more. This rehydration trick is a lifesaver for older or dried-out clay, minimizing waste. Once softened, thoroughly knead the clay to ensure an even consistency, much like preparing bread dough. Then, roll it out evenly onto your cutting board or non-stick mat, aiming for a consistent thickness of about 1/8 to 1/4 inch (3-6mm). This thickness provides good durability without being too heavy. Finally, using your fish-shaped cookie cutter, begin cutting out your school of fish. Don’t be afraid to experiment with different sizes if you happen to have multiple cutters, as this adds visual interest.
2. Smoothing Edges and Refining Forms
Once your charming fish shapes are cut, take a moment to refine their appearance. Dip your finger in a small container of water and gently run it along all the cut edges of each fish. This simple yet effective technique smoothly eliminates any sharp, rough, or uneven edges left by the cookie cutter, giving your fish a more organic, streamlined, and polished look. Water is your best friend when working with air dry clay, allowing for seamless blending and shaping without adding extra material. Pay attention to the subtle curves and ensure all edges feel smooth to the touch.
3. Creating Movement and Three-Dimensionality
Now for the truly creative part: bringing your fish to life with movement and dimension! Use a toothpick or a fine-tipped skewer to carefully poke a small, distinct eye on each fish. This tiny detail adds immense character and instantly makes your shapes recognizable as fish. To create a dynamic, lifelike school, avoid leaving all your fish perfectly flat. Gently bend and curve them in various directions. Some can remain flat to provide contrast, while others curve gracefully to the left or right, suggesting motion, a current, or a playful dart through water. You can even experiment with gently arching their bodies or tails upwards or downwards. This variation in form and orientation will make your finished artwork much more engaging, sculptural, and visually captivating, giving the impression of an active aquatic scene.
4. Drying, Sanding, and Painting Your Sculptural Fish
Once shaped, carefully place your clay fish on your cutting board or a wire rack to air dry completely. Ensure they are spaced out to allow for good air circulation on all sides, which helps prevent warping or cracking. Always follow the manufacturer’s instructions for your specific clay regarding drying times. Typically, this can take anywhere from 24 to 72 hours, depending on the thickness of your pieces and the humidity in your environment. Once fully dry, the clay will feel hard, lightweight, and cool to the touch. At this point, gently sand any remaining rough edges or subtle imperfections with fine-grit sandpaper to achieve a smooth, professional finish. Now, it’s time to add that gorgeous glimmer! Prepare your shimmering acrylic paint by watering it down slightly. I achieved a lovely, translucent wash effect by adding just a few drops of paint to about a tablespoon of water. This creates a beautiful sheen that enhances the clay’s texture. Lightly brush the paint onto each fish, embracing a loose, artistic application rather than a heavy, opaque coat. I painted both sides of my fish and ended up applying two very light coats, though I often find a single, carefully applied coat offers a beautifully subtle shimmer and allows more of the natural clay texture to show through. Remember to let each side dry thoroughly between coats to prevent smudging and achieve an even finish.
5. A Valuable Lesson Learned: Choosing the Right Top Coat
Here’s a valuable tip from my own experience that could save you some unexpected results: I attempted to apply a glossy top coat using some leftover varnish I had on hand, hoping to add an extra layer of shine and protection. While my intention was good, the varnish unexpectedly caused the paint to crackle slightly upon drying. In this particular project, it serendipitously enhanced the “fishy” texture, giving them a more intriguing, scale-like appearance which I actually loved and felt added to the organic aesthetic! However, for most other DIY clay art projects where a perfectly smooth, unblemished finish is desired, this serves as a crucial word to the wise: always use craft supplies specifically designed for your project. Don’t compromise on quality or try to substitute with incompatible materials, as the results can be unpredictable and potentially spoil your hard work. If you desire a protective or glossy finish, invest in a good quality sealant, varnish, or glaze that is explicitly made for acrylic paints and air dry clay. This ensures compatibility and predictable, beautiful results.
6. Assembling Your Aquatic Scene Masterpiece
For the background of my artwork, I utilized a textured, beachy wallpaper sample I happened to have. This choice perfectly complemented the modern coastal theme of the fish. If you don’t have wallpaper, there are countless other options: gorgeous scrapbook papers with ocean motifs, fabric swatches, a piece of painted canvas, or even cork board can create a stunning and unique backdrop. First, glue your chosen background material securely to a sturdy piece of cardboard for added rigidity and support. Ensure it’s smooth and fully adhered before proceeding. Once dry, it’s time for the exciting arrangement phase. Before applying any adhesive, “dry fit” your fish onto the background. Experiment with different configurations, playing with spacing, orientation, and subtle overlapping until you achieve your desired “school” formation and a visually appealing composition. This planning stage is crucial. Once completely satisfied with the layout, use your 5-minute epoxy to carefully attach each fish. Apply a small, conservative dot of epoxy to the back of each fish and press it firmly onto the background. For added depth and a truly three-dimensional effect, you can even glue some fish directly onto others, creating layers and a sense of dynamic movement. Work quickly but precisely, as 5-minute epoxy sets fast, giving you limited time to adjust. A toothpick can help apply tiny amounts of epoxy for precision.
7. Finishing Touches and Displaying Your Art
Once all the fish are meticulously placed and glued, allow the epoxy to cure fully for at least a couple of hours – or even longer, just to be absolutely sure of maximum adhesion! I made a quick check to ensure every single fish was securely attached; in my case, I found one rogue fish that needed a tiny touch-up with glue, which was easily remedied. The resilience and long-lasting strength of epoxy is truly impressive; I’ve used this same type of adhesive for my DIY agate slice art almost five years ago (time truly flies!), and it’s still holding strong and perfectly intact today. Finally, carefully insert your completed sculptural piece into a simple white picture frame. It’s crucial that the glass is removed to allow the beautiful three-dimensional effect of your fish to truly shine through without obstruction. A minimalist frame, like the IKEA one I used, helps the artwork truly stand out as the focal point, enhancing its modern coastal appeal. Your unique piece of art is now ready to adorn your walls!
The Enduring Charm and Versatility of DIY Clay Fish Art
I am absolutely delighted with how this DIY clay fish art turned out. The shimmering effect, especially when kissed by natural sunlight, is simply magical, catching the light and creating a dynamic play of reflections. The overall aesthetic radiates a fun, modern coastal charm that perfectly complements my home decor. This project isn’t just a beautiful addition to my home; it’s also incredibly versatile and suitable for crafters of all skill levels, from beginners to more experienced artists. In fact, it would make such an easy and engaging project to involve children in, fostering their creativity, improving fine motor skills, and introducing them to the joy of making something with their own hands. Imagine the different colors, shapes, and textures they could create to personalize their own aquatic scenes!
Capturing the Shimmer: A Photographer’s Unique Challenge
One minor, albeit humorous, challenge I encountered was adequately photographing the finished artwork. The optimal spot in my home for capturing its beautiful shimmer in natural light also happens to be the prime location for observing the lake, which inevitably attracted my furry companions. Various puppies enthusiastically blocked the light, making it quite a comical task to adequately convey just how wonderfully these little clay fishies sparkle and glow in person! It was a good reminder that sometimes, the true magic and tactile beauty of handmade art is best experienced directly, rather than through the lens of a camera.
Beyond My Creation: Admiring the Original Artistic Inspiration
While I’m incredibly proud and happy with how this air dry clay fish project turned out, and deeply satisfied that I finally found the motivation to utilize my long-held bag of clay, I must humbly acknowledge the superior artistry and craftsmanship of the original ceramic art by KaroArt. Her work is truly, immensely, much (!) better and served as an exceptional, powerful catalyst for my own creativity. If you ever have the chance, I wholeheartedly recommend exploring the Etsy shop of this wonderfully talented ceramic artist, based in Dublin, Ireland. Karo’s artistic range extends far beyond fish; she also crafts gorgeous ceramic bowls that are both functional and artistic, dreamy storm cloud ceramic mugs perfect for cozy evenings, and charming heart-shaped wall art that adds a touch of warmth and personality to any space. Supporting independent artists like Karo not only brings unique beauty into the world but also provides endless inspiration for fellow crafters and art enthusiasts. Her pieces are a testament to the beauty and versatility of ceramic art.