Bunkie Exterior Makeover: A Vibrant Turquoise Transformation for Our Guesthouse
Today, I’m thrilled to share a significant step in our ongoing journey to transform our property: a complete mini bunkie exterior makeover! It’s true, after much planning and a little procrastination, our beloved guesthouse is finally receiving the attention it deserves. This project showcases how a strategic splash of color can dramatically rejuvenate a space, and I’m excited to walk you through every detail of this vibrant renovation.
You might have even caught a glimpse of this vibrant update in my recent post about new dresses. Perhaps your attention was captivated by the bold zebra print, or maybe, just maybe, the captivating turquoise door subtly stole the spotlight? I must admit, there are moments I seriously consider a career pivot from DIY blogging to fashion blogging, especially when I find myself posing so naturally in front of this striking turquoise entrance. It feels like a genuine calling!

Purely joking, of course! (I’m sure my former PhD supervisor would be utterly bewildered.) My true passion lies in the transformation of spaces, especially when achieved with creativity and a keen eye for budget-friendly solutions. This bunkie project perfectly embodies that spirit, proving that impactful changes don’t always require a hefty investment.
From Storage Unit to Cozy Retreat: The Bunkie’s Interior Evolution
The groundwork for this exterior transformation was laid with an earlier interior project. Last fall, after consulting all of you on the fate of the pine walls, I made a decisive choice to keep them natural. Seeing Cassie’s beautifully styled master bedroom truly solidified this decision. However, as often happens with ambitious DIY endeavors, winter arrived before I could make significant headway. The bunkie’s full potential, regrettably, had to wait another year.
Unwilling to let another season pass without tangible progress, I committed to action. The initial step involved a comprehensive overhaul of the interior. I meticulously cleared out all the furniture and miscellaneous items that had accumulated, effectively repurposing the bunkie from a glorified storage space back into a functional, inviting area. Following this, the room received a deep scrub, which included the rather adventurous task of evicting approximately three dozen spectacularly large spiders – a true test of dedication for any DIY enthusiast! With the space thoroughly cleaned and refreshed, I introduced the elegant maple dresser my Mom had generously lent (and eventually gifted) me, and then installed the comfortable queen bed that previously served our townhouse guestroom.
Almost instantaneously, what was once an underutilized storage shed blossomed into a charming, proper guest room! It’s genuinely surprising how minimal the effort was to conjure such a cozy and welcoming atmosphere. (For a closer look, you can explore the bunkie bedroom details here.) The success of the interior ignited my motivation for the exterior. For the bunkie exterior makeover, my vision was clear: a strategic application of paint to brighten its worn façade and eliminate any lingering shabbiness.
Before the Transformation: A Look at the Weathered Exterior
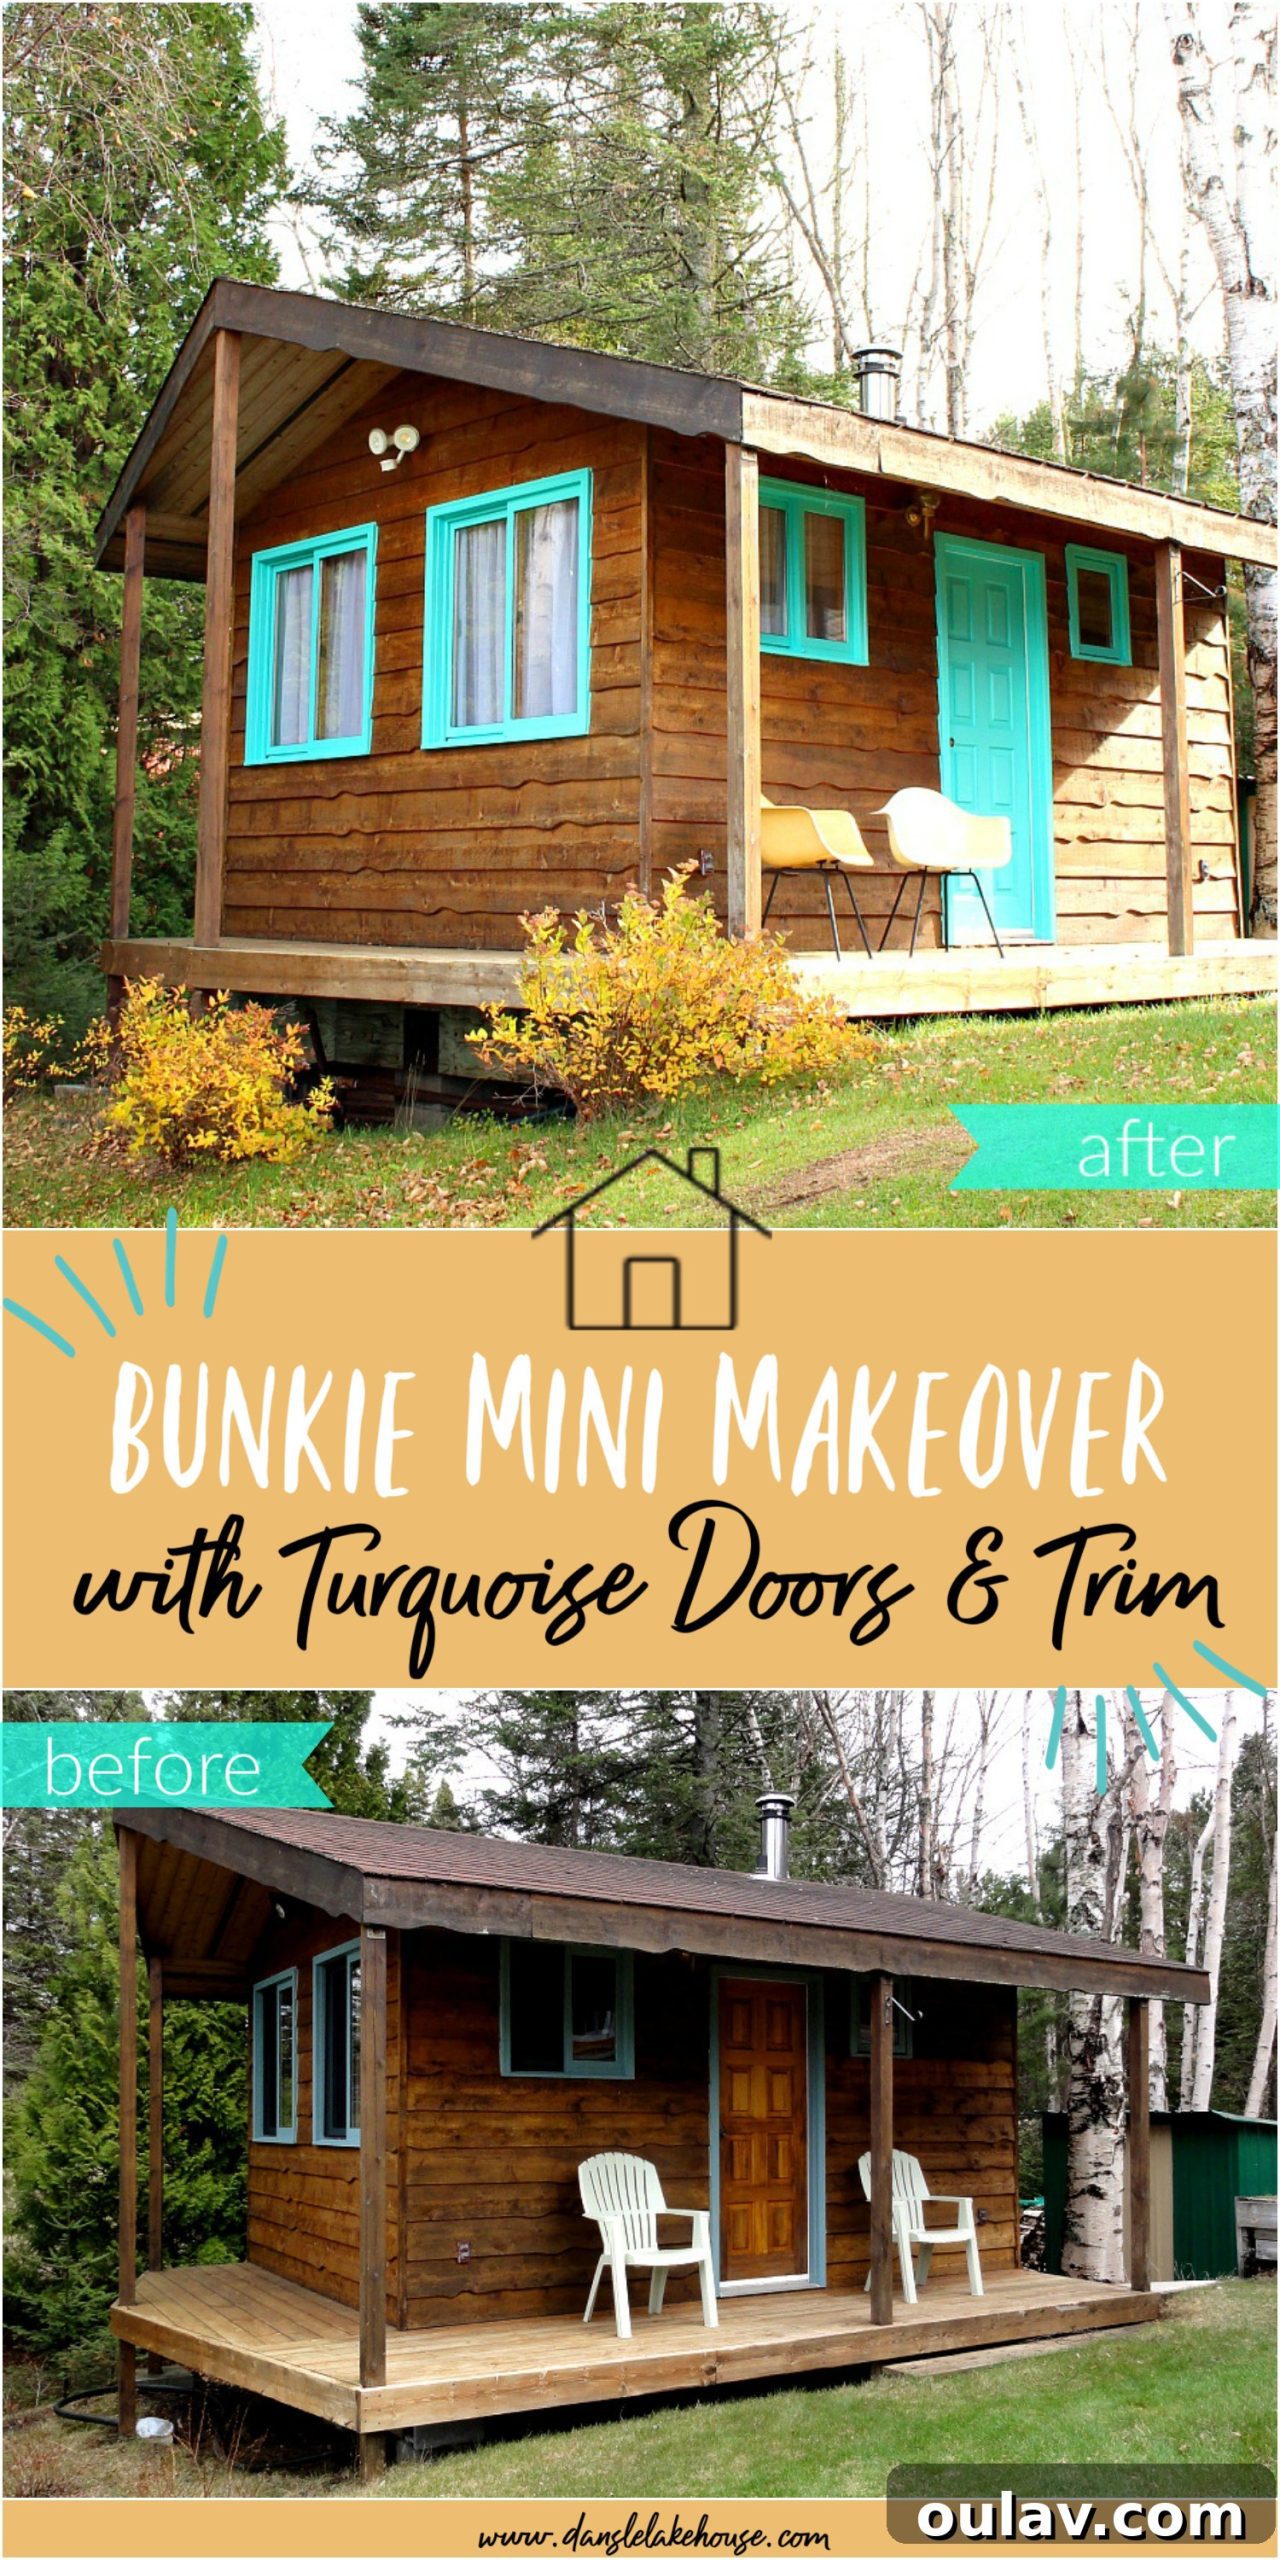
To truly appreciate the “after” pictures, it’s crucial to understand the “before” state of our guesthouse. Situated in a spot that receives relentless sun exposure throughout the day, the bunkie’s door had become severely weathered and worn over time. Its original finish was faded, cracked, and peeling, a clear indicator of its battle against the elements. Furthermore, the pale sage green stain, which a previous owner had somewhat haphazardly applied to the trim, was actively flaking and peeling in numerous areas. This not only detracted significantly from the bunkie’s curb appeal but also left the underlying wood vulnerable to further damage. The exterior was in desperate need of a protective and aesthetic overhaul.


The wood surfaces were undeniably rough, demanding immediate attention. Recognizing that thorough preparation is the cornerstone of any successful and durable paint job, I gathered my supplies: a trusty sander, a potent cleaner, primer, and, of course, the vibrant paint. The meticulous prep work began.
The Meticulous Prep Work: Building a Foundation for Lasting Beauty
The first crucial step was sanding the trim and the door. This was a time-consuming process, but absolutely non-negotiable for achieving a professional and lasting finish. My objective wasn’t merely to smooth the existing surfaces; it was to thoroughly scuff up any remaining intact finish and, critically, to remove every single flake and chip of the old, peeling paint and stain. Skipping this vital step would have inevitably led to future adhesion issues and a prematurely failing paint job. Patience and thoroughness here truly pay off in the long run.
Once the sanding was complete, a deep cleaning was essential. I chose TSP (Trisodium Phosphate), a highly effective cleaner known for its ability to cut through grime and prepare surfaces perfectly for painting. After a rigorous scrub, I rinsed the entire area meticulously, ensuring no cleaner residue remained. This was followed by an extended drying period of a couple of days. This generous drying time is paramount, especially for exterior projects, as any lingering moisture can severely compromise the adhesion and longevity of the subsequent primer and paint coats.

With the surfaces impeccably clean and dry, it was time for the primer. I applied an exterior-grade door and trim primer. The importance of primer cannot be overstated; it acts as a crucial barrier, enhances paint adhesion, blocks potential stains from bleeding through, and provides a uniform, receptive base for the topcoat. The specific primer I used necessitated an 8-hour cure time between coats and an overnight dry before any paint could be applied. Strictly adhering to these manufacturer guidelines is paramount for achieving a durable, professional-quality finish that will valiantly withstand years of outdoor exposure.
The Vibrant Choice: Why Turquoise for Our Bunkie?
Finally, two full days after the priming stage was meticulously completed and thoroughly dry, the moment arrived for the exhilarating application of color! I chose a brilliantly bright turquoise – not just any turquoise, but the exact same captivating shade we had previously used for our main mid-century inspired front door. This was a calculated decision born out of both practicality and aesthetic desire. We still had nearly a gallon of this fantastic paint, and it seemed a wonderful opportunity to create a cohesive visual thread across our property while ingeniously preventing material waste. This particular vibrant hue possesses an undeniable ability to instantly uplift any space it adorns, and I was confident it would be the perfect, cheerful accent for our bunkie exterior makeover.
The decision to infuse the guesthouse trim and door with turquoise was a deeply considered one. Beyond the immediate benefit of utilizing existing paint, turquoise brings a multitude of advantages to an exterior setting. Its inherently bright, inviting, and somewhat whimsical nature instantly transforms the entrance into a compelling focal point, effectively beckoning guests inward. Against the rustic charm of the natural wood siding of the bunkie, which I have no intention of painting, the turquoise creates a breathtaking contrast. It introduces a fresh, undeniably modern pop of color that beautifully balances the organic textures of the wood, culminating in a unique, captivating, and utterly charming curb appeal that stands out with understated elegance.


I am particularly enchanted by the anticipation of how this lively turquoise will interact with the changing seasons. As the leaves begin their spectacular annual transformation into a breathtaking tapestry of gold, deep crimson, and burnt orange, the vivid turquoise will offer an absolutely incredible and unexpected visual counterpoint. While I confess I may not be as overwhelmingly enthusiastic about the arrival of Fall as a significant portion of North America appears to be, I continuously seek out small, beautiful details to eagerly anticipate and genuinely cherish. This striking color combination is unequivocally one of those delightful details, promising a stunning contrast that elegantly celebrates both nature’s profound palette and our own artistic flair, making the bunkie a beacon of cheer even as the weather cools.


The Stunning Aftermath: A Welcoming Oasis Emerges
I am absolutely enamored with the outcome of this bunkie exterior makeover! The transformation is nothing short of remarkable, effortlessly elevating the guesthouse from a somewhat neglected structure to an undeniably inviting and cherished focal point on our property. The brilliant turquoise, set against the warm, natural wood siding, creates a fresh, modern cottage aesthetic that feels simultaneously charming, chic, and incredibly welcoming. It stands as a powerful testament to the transformative potential of paint, proving that even seemingly small changes can yield the most dramatic and satisfying results in terms of visual impact and overall atmosphere.
This project, like so many home improvements, is an ongoing journey, a testament to continuous progress rather than a final destination. While the primary goal of refreshing the door and trim has been gloriously achieved, there remain several exciting elements on my future radar. At some opportune moment, I fully intend to refinish the charming mini deck, painstakingly bringing its weathered wooden surfaces back to their former glory. The existing light fixture is also earmarked for a much-needed update – envisioning something more contemporary and aesthetically aligned with the bunkie’s newfound vibrant personality. And that perfectly positioned hook beside the door? It practically whispers for a luxuriant hanging plant, which would add another delightful layer of warmth, organic texture, and welcoming greenery to the entrance, further enhancing its curb appeal.

Our overarching mission for this guesthouse continues to revolve around thoughtful, budget-conscious improvements. We are operating without a vast sum of money to invest, particularly considering the significant bathroom renovation it so desperately needs internally. However, by steadfastly chipping away at projects little by little, diligently prioritizing immediate impact, and resourcefully utilizing existing materials (like that invaluable leftover turquoise paint!), we are steadily, yet surely, cultivating a truly special and unique retreat. The profound joy of witnessing immediate visual improvement, especially without financially straining ourselves, is an incredibly rewarding and motivating aspect of this entire DIY endeavor.
Small Steps, Big Impact: The Enduring Bunkie Journey
There is, without a doubt, still a substantial amount of work awaiting us on this bunkie, encompassing both its interior and exterior facets. Nevertheless, I derive immense satisfaction and joy from these “baby steps” – each small victory building towards a grander vision. The mere fact that I no longer have to cast a glance from the main house and wince at the sight of worn, peeling trim and a faded door is, in itself, a triumphant achievement. This bunkie exterior makeover powerfully demonstrates that sometimes, the simplest, most cost-effective changes are capable of making the most profound difference in both curb appeal and our personal enjoyment of our home.
Ultimately, this journey is about celebrating every single stride of progress, no matter how seemingly minor, and continuously envisioning the boundless potential residing within every corner of our cherished home. This vibrant turquoise transformation transcends mere paint; it embodies a renewed sense of purpose and a fresh identity for our guesthouse, poised to welcome friends and family with open arms, a cheerful disposition, and a strikingly memorable exterior. Stay tuned for more updates as we enthusiastically continue to chip away at the fascinating evolution of our beloved bunkie!