
Transform Your Favorite Sweaters: A Guide to DIY Needle-Felted Repair and Embellishment
As the chill of winter recedes and the vibrant energy of spring awakens, many of us embark on the annual ritual of transitioning our wardrobes. This often means carefully packing away cozy sweaters and heavy coats, making room for lighter, brighter attire. Beyond merely swapping garments, this seasonal shift presents a perfect opportunity for a thorough wardrobe audit – a chance to care for our beloved winter pieces, mend any wear and tear, and prepare them for their next season of use. It’s a moment to bid a temporary farewell to winter warmth, ensuring each item is cleaned, cared for, and revitalized before storage, making space for the renewed spirit of spring.
Part of this essential process involves meticulously washing delicate woolens, ensuring they remain in pristine condition. For those “dry clean only” items, I highly recommend using a specialized wool wash like Eucalan. This gentle, no-rinse formula is perfect for hand-washing cashmere and other fine wools at home, preserving their softness and integrity. Additionally, a sweater shaver is an invaluable tool for removing any unsightly pills or bobbles that accumulate over time, instantly refreshing the garment’s appearance and making it look new again. Proper care at this stage extends the lifespan of your cherished pieces, making them ready to welcome you back next autumn.
The Art of Mending: Giving New Life to Worn Woolens
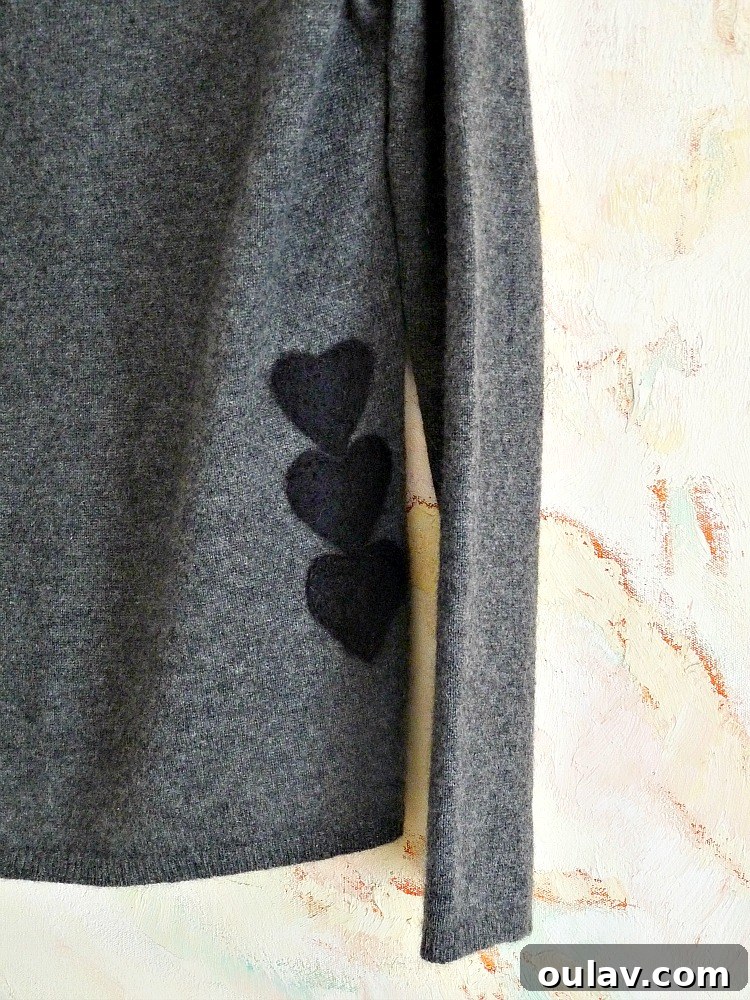
During one such seasonal refresh, my mother discovered a small but frustrating hole in a favorite cashmere sweater. While perfectly lovely, the sweater was rather plain, and the hole threatened its continued wearability. Instead of discarding it – a thought many of us entertain when faced with damage – we saw an opportunity for creative intervention. Inspired by a collection of cozy winter craft ideas (particularly this delightful polka dot sweater tutorial), we decided a DIY needle-felted wool patch would be the perfect solution. This technique not only conceals the flaw but also infuses the garment with a unique, whimsical charm, transforming a simple repair into a personalized embellishment.
Visible mending, as this approach is often called, has gained popularity not just as a sustainable practice but also as an artistic statement. It celebrates the journey of a garment, adding character and history rather than hiding imperfections. By choosing to mend with needle felting, you’re not just fixing a hole; you’re telling a story, making a statement about valuing your possessions, and embracing creativity. For my mom’s sweater, we opted for a series of small hearts, arranged in a playful row. This not only effectively covered the hole but also gave the otherwise unassuming sweater a touch of personality that even a style icon like Jessica Day might appreciate (perhaps with a brighter color choice, but my attempts to convince my mom to go bolder with pink or yellow were met with a firm, elegant “no”).
Essential Supplies for Your Needle Felting Project
Before diving into the creative process, gathering the right tools is key. Needle felting is surprisingly simple and requires only a few specialized items. Each plays a crucial role in transforming loose wool fibers into a solid, integrated design. Here’s a breakdown of what you’ll need:
- Wool Sweater: The canvas for your project. Ensure it’s clean and free of loose fibers or pills (use a sweater shaver if needed). Cashmere, merino, or any natural wool sweater works beautifully for felting.
- Needle Felting Needle: These specialized needles have tiny barbs along their shaft, which tangle and compress wool fibers as you repeatedly poke them. They are extremely sharp and brittle, so handle with care. Often sold in sets with different gauges for various tasks (coarser for initial felting, finer for details).
- Foam Block: This dense foam mat serves as a protective surface beneath your project. It allows the needle to pass through the wool without damaging your work surface or breaking the needle.
- Wool Roving: Unspun wool fibers, available in a vast array of colors. This is what you’ll be felting onto your sweater. Choose a color that complements or contrasts beautifully with your sweater. We opted for classic black, but the possibilities are endless for creating vibrant designs.
- Cookie Cutter: An optional but incredibly helpful tool for creating consistent shapes. For our heart design, a cookie cutter provided a clear outline. Alternatively, you can freehand your design directly onto the sweater or draw it with fabric chalk.
- Iron: Used for a final pressing to help smooth and set the felted design.
Step-by-Step Guide to Needle Felting Your Sweater
With your supplies ready, it’s time to bring your creative vision to life. The process is straightforward, but patience and gentle precision yield the best results. Follow these steps to transform your damaged sweater into a personalized work of art.
1. Prepare Your Work Surface and Sweater
Begin by laying your sweater flat. Carefully slide the foam block underneath the area you intend to mend or embellish. Ensure the fabric is smooth and taut over the foam, avoiding any wrinkles or bunching. This provides a stable and protective base for the felting process. If you’re mending a hole, try to slightly overlap the edges of the hole with the roving to secure it firmly.
2. Shape Your Design with Wool Roving
Next, take a small, thin amount of wool roving. Resist the urge to use a large clump right away, as this can be difficult to felt evenly and may result in a bulky patch. Instead, work with multiple thin layers for a smoother, more refined finish. If using a cookie cutter, place it firmly on the sweater over the foam block. Gently arrange the roving within the cookie cutter’s outline, ensuring an even distribution of fibers. For freehand designs, lightly sketch your pattern onto the sweater with fabric chalk or simply visualize your shape.
3. The Felting Process: Stab, Stab, Stab (Safely!)
Now comes the most satisfying part of needle felting! Hold your needle felting needle perpendicular to the surface of the wool. Begin repeatedly stabbing the roving within your chosen design. The tiny barbs on the needle catch the wool fibers, pushing them through the sweater fabric and tangling them together, effectively “felting” them into place. Work slowly and methodically, ensuring you cover the entire area of your design. For an even finish, lift the cookie cutter occasionally and rotate your sweater slightly. This also helps prevent the roving from felting to the cookie cutter itself.
Important Safety Note: These needles are incredibly sharp and brittle. Always be mindful of your fingers and keep them clear of the needle’s path. A finger guard or thimble can be a wise investment, especially for beginners. Nothing alleviates stress quite like the repetitive motion of felting, but nothing ruins a project faster than a painful finger prick!
4. Build Layers and Refine Your Design
Continue adding thin layers of roving and felting until your patch reaches the desired thickness and density. You’ll notice the roving starting to firm up and integrate with the sweater fabric. For a truly professional finish, pay attention to the edges, ensuring they are well-defined and neatly felted. If you find any areas that feel too loose or sparse, simply add more roving and continue felting until it’s secure. The goal is a patch that feels firmly attached and cohesive with the sweater.
5. The Finishing Touch: Ironing Your Patch
Once all your felted designs are complete and securely attached, it’s time for a final pressing. Remove the foam block from beneath the sweater. Set your iron to the “wool” setting (or a medium heat without steam). Gently press the felted areas, moving the iron slowly over the surface. This step helps to smooth out any stray fibers, further compress the wool, and set the patch, giving it a more polished appearance. Some crafters prefer to lightly mist the patch with water before ironing for an even smoother finish, but it’s not strictly necessary. This step enhances the durability and neatness of your newly created embellishment.
Caring for Your Newly Embellished Sweater
Your beautifully mended and personalized sweater now requires the same gentle care as before, if not more. Since the original sweater was likely delicate, especially if it’s cashmere or fine wool, hand washing remains the recommended method. This involves soaking the sweater in cool water with a mild wool-safe detergent, gently swishing it, rinsing thoroughly, and then carefully pressing out excess water (never wring!). Lay the sweater flat on a clean towel or a drying rack to air dry, reshaping it as needed. This ensures your needle-felted patch stays intact and vibrant for many seasons to come.
Beyond Sweaters: More Needle Felting Inspiration
The versatility of needle felting extends far beyond sweater repairs. This quick and engaging technique can be applied to a myriad of textile projects, adding unique texture and charm. Imagine enhancing a plain wool pillow with a dense, repeating pattern of felted shapes or a whimsical animal motif. A series of tiny felted flowers or geometric designs could transform a simple tote bag or a pair of felted slippers. Even scarves, mittens, or hats can benefit from a touch of personalized felted art. The beauty of needle felting lies in its ease and the relatively short time it takes to achieve impressive results. Experiment with different colors and shapes of wool roving to create intricate, personalized designs that reflect your style and creativity.
Embrace the Whimsy: Your Next DIY Adventure Awaits
Repairing and personalizing your clothing with needle felting is not just a practical skill; it’s a delightful journey into creativity and sustainable living. It empowers you to transform an ordinary garment into something truly unique, extending its life and reducing waste. The joy of wearing something you’ve lovingly mended or embellished is unparalleled. So, gather your supplies, embrace the therapeutic rhythm of the needle, and infuse your wardrobe with a touch of handmade charm. Happy felting!