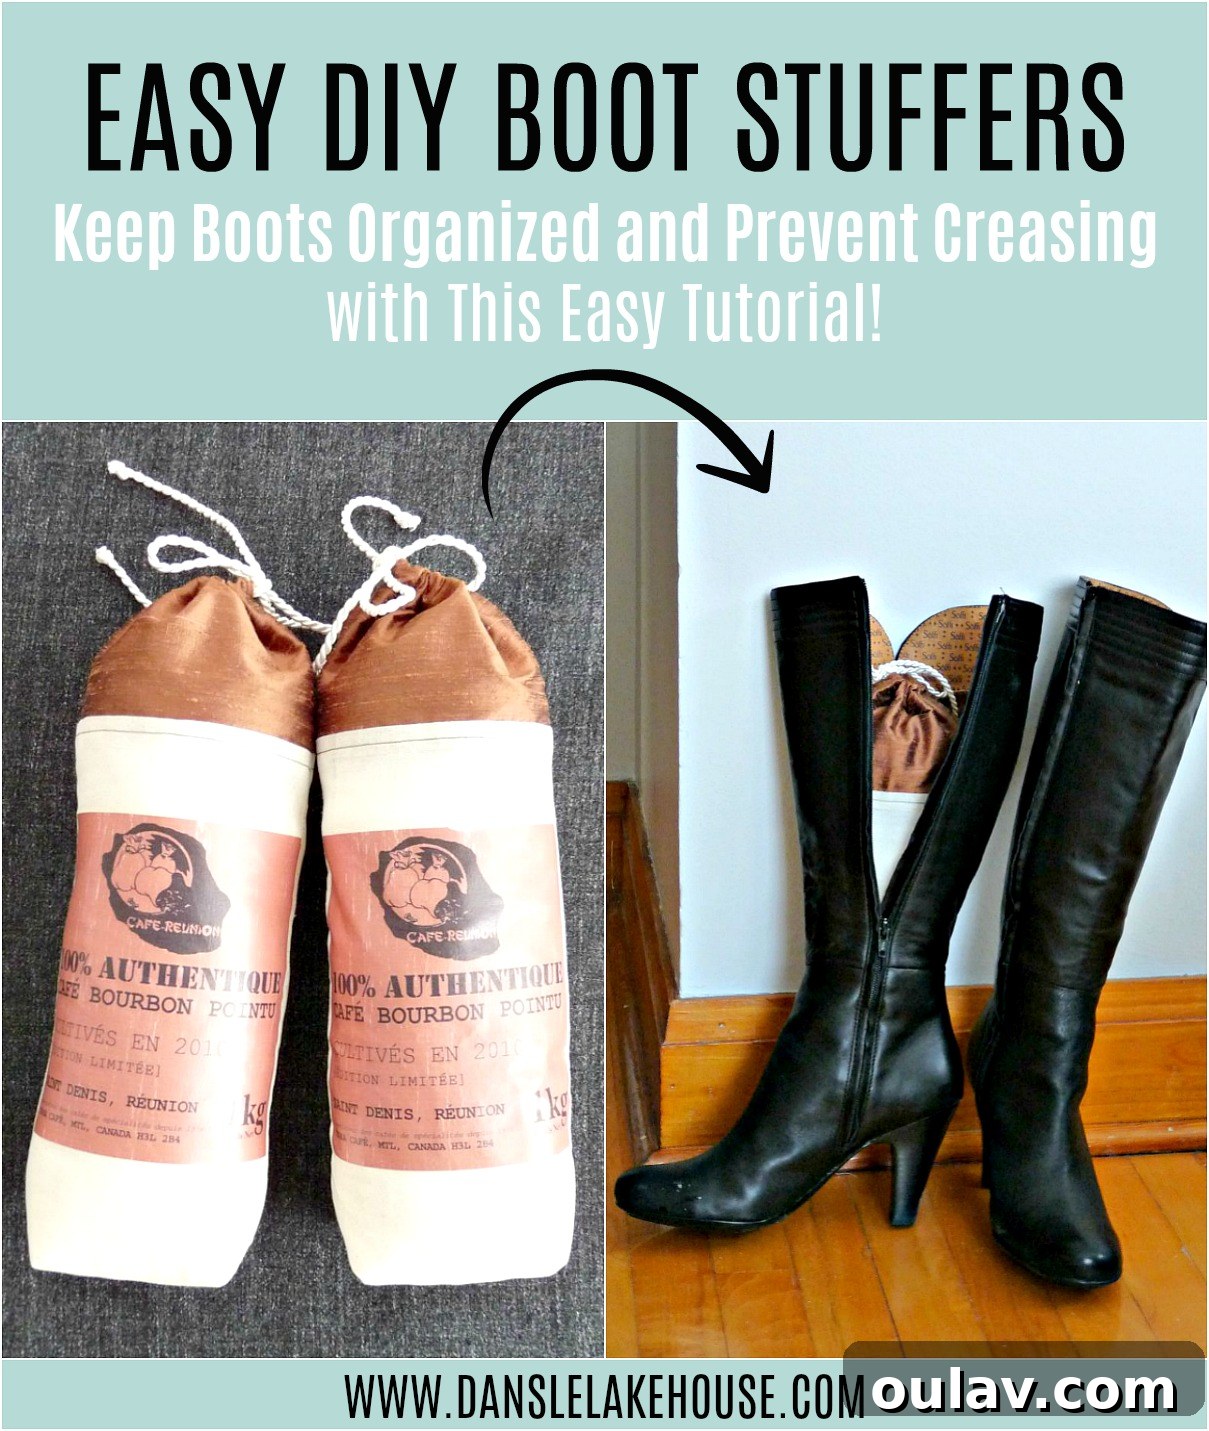
DIY Boot Stuffers: Keep Your Boots Upright, Organized, and Freshly Scented
Are you tired of your beloved boots flopping over in the closet, creating unsightly creases and taking up valuable space? Does the thought of investing in expensive boot shapers make you wince, especially when you’re trying to save money for bigger dreams? You’re in luck! This comprehensive guide will show you how to craft your own beautiful, functional, and aromatic DIY boot stuffers using simple materials. Not only will these homemade boot shapers protect your footwear and keep your closet organized, but they also offer a fantastic opportunity to repurpose scrap fabric and infuse your storage with the delightful scent of dried lavender or your favorite essential oils.
The Smart Way to Save: Why DIY Boot Stuffers?
My mother and I share a common struggle: a love for beautiful things that often clashes with our desire to save money. However, our spending habits diverge. I tend to splurge on significant items, like our light fixture from Modernica, but then I’ll cut corners everywhere else, living frugally to compensate. My mom, on the other hand, rarely makes large, splashy purchases. Instead, her budget dwindles through a series of smaller indulgences – designer soaps, luxurious new linens, or fluffy towels – all those little luxuries that quietly add up.
With both of us working with modest budgets, I’ve been gently, yet persistently, encouraging my mom to forgo these smaller treats. My goal? To help her save diligently for a long-dreamed-of bathroom renovation. It’s this encouragement, bordering on relentless nagging, that led to our boot stuffer project. For months, she admired and “fondled” the stylish boot stuffers in stores, picking them up at least twenty times but, to her credit, never making a purchase. Go, Mom!
Her main desire was practical: to keep her elegant boots standing tall and proud in the closet, preventing them from slouching, creasing, and losing their shape. Instead of succumbing to the temptation to buy them, we decided to embark on a DIY project. The best part? We already had all the necessary materials on hand, making this project completely free! While saving $10-20 on boot stuffers might seem like a mere drop in the bucket, every single penny saved is another step closer to her dream bathroom. This simple act of creative repurposing exemplifies how small, mindful choices can contribute significantly to larger financial goals. Beyond the monetary savings, crafting your own boot shapers allows for complete customization, letting you match them to your personal style or closet aesthetic, and even add a refreshing scent.
The Essential Benefits of Proper Boot Storage
Investing in quality boots, whether they are sleek riding boots, stylish ankle boots, or rugged winter footwear, means you want them to last. Proper storage is paramount to their longevity and appearance. Here’s why using boot stuffers, especially our DIY version, is so beneficial:
- Prevents Creasing and Wrinkling: The primary benefit of boot stuffers is maintaining the original shape of your boots. Without support, boot shafts tend to fold and crease, leading to permanent damage and an unkempt look. Stuffers keep them upright, preventing these unsightly lines.
- Extends Boot Lifespan: By preserving the material and structure, boot stuffers significantly extend the life of your footwear, protecting your investment.
- Optimizes Closet Space: Boots that stand upright take up less floor space and create a tidier, more organized closet. This makes it easier to see and access your entire boot collection.
- Improves Air Circulation: Keeping boots open and upright allows for better air circulation inside, which helps to dry out any moisture and prevent the buildup of odors and mildew.
- Adds a Fresh Scent: Our DIY method incorporates dried lavender or essential oils, transforming your boot storage into a fragrant haven. This keeps your boots smelling fresh and can even subtly scent your entire closet.
- Protects Material: When boots collapse, delicate materials like suede or soft leather can rub against each other, causing scuffs or damage. Stuffers prevent this friction.
Gathering Your Supplies for DIY Boot Stuffers
One of the joys of this project is its flexibility. You can likely find most of these items around your home, making it a truly budget-friendly endeavor. Here’s what you’ll need:
- Scrap Fabric: Get creative! Old coffee sacks, denim from worn-out jeans, sturdy canvas, or even decorative remnants work perfectly. If you want a fun print, something like this cowboy boot print aqua fabric (lol) could add a playful touch. The key is to choose something durable enough to hold its shape once stuffed.
- Sewing Machine: While hand-sewing is possible, a sewing machine will make this project much quicker and create more durable seams.
- Thread: All-purpose polyester thread in a color that matches or complements your fabric.
- Satin Cord or Ribbon: This will serve as your drawstring. You can find inexpensive options at most fabric or craft stores. A sturdy ribbon or even thick twine could also work.
- Large Safety Pin: Essential for threading the cord through the channel.
- Stuffing Material: Polyester fiberfill, known as batting, is ideal. However, you can also repurpose old t-shirts, plastic grocery bags, or even cedar chips for a natural insect repellent. The amount needed will depend on the size of your boots.
- Dried Lavender or Essential Oils (Optional): For that wonderful, fresh scent. Lavender is known for its calming properties and pleasant aroma, perfect for keeping closets smelling inviting.
Step-by-Step Guide: How to Make Your Own DIY Boot Stuffers
Follow these detailed instructions to craft your custom boot stuffers. The process is straightforward, even for beginner sewers, and the results are incredibly rewarding.
1. Measure and Prepare Your Fabric
We began our project with some charming coffee sacks. While they offered a unique aesthetic, they were initially too wide and short for our boots. We carefully cut them apart to salvage the attractive design elements. The key to successful boot stuffers lies in precise measurements tailored to your specific boots. Measure the interior height of your boots (from the sole to the top edge of the shaft) and the circumference of the boot shaft at its widest point. These measurements will guide the size of your fabric pieces. Remember to add a small seam allowance (typically 1/2 to 1 inch) to all sides for sewing.
2. Assemble and Sew Fabric Pieces
Since our coffee sacks were too short, we needed to add length. We decided to sew a contrasting piece of silk fabric to the top edge of the coffee sack material. This not only provided the necessary height but also added a touch of elegance. This step highlights how DIY boot stuffers are an excellent opportunity to use up leftover fabric scraps and combine different textures and patterns.
Once your fabric pieces are joined (if necessary) and cut to the correct dimensions for height and width (remembering your seam allowance), it’s time to sew the main body. Fold your fabric in half lengthwise, right sides together, and sew up the side seam, creating a tube. Next, focus on the top edge, which will become the opening of your boot stuffer. Fold the top edge down twice (about 1/2 inch then another 1 inch) to create a channel. Stitch this hem in place, leaving a small opening for threading your drawstring. This channel is crucial for the drawstring mechanism that will allow you to close and adjust the top of your boot stuffer.
3. Create a Flat Bottom for Stability
After the side and top seams are sewn, it’s time to create a stable, flat bottom for your boot stuffer. This ingenious tweak ensures the stuffer sits snugly and securely inside your boots, preventing it from wobbling. To achieve this, turn the boot stuffer inside out. At the bottom corners, pinch each corner flat so that the side seam aligns with the bottom fold. Pin these corners securely. Then, sew across each pinned corner, creating a small triangle that flattens the bottom of the bag. The size of this sewn-off corner will determine how wide and flat your base becomes.
Once you turn the boot stuffers right side out, you’ll see that the sewn corners create a neat, flat bottom. This clever design detail ensures the stuffer stands upright and fits snugly into the footbed of your boots, providing maximum support.
4. Thread the Drawstring, Stuff, and Scent
The final steps bring your DIY boot stuffers to life! Take your chosen satin cord (or ribbon) and attach a large safety pin to one end. Thread the safety pin through the channel you created at the top of the boot stuffer. Gently work the safety pin around the entire channel until it emerges from the other side. Tie the two ends of the cord together securely.
Now, it’s time to add the stuffing. We used batting, but any suitable filler will work. Carefully fill the boot stuffer, ensuring it’s firm enough to provide ample support to your boots without being overly packed. The drawstring top is particularly useful here, as it allows you to adjust the amount of stuffing as needed, ensuring a perfect fit for boots of varying shaft widths.
For an added sensory delight, sprinkle in a generous amount of dried lavender. This not only keeps your boots smelling fresh but also infuses your closet with a pleasant aroma. If you prefer, a few drops of your favorite essential oil on a cotton ball placed inside the stuffer will also work. The drawstring closure makes it easy to open the stuffer later to refresh the lavender or add more stuffing as time goes on.
Customization and Variations for Your Boot Shapers
The beauty of DIY projects lies in their adaptability. You can easily customize these boot stuffers to perfectly suit your needs and style:
- Fabric Choices: Experiment with different fabrics! Use sturdy denim for a casual look, elegant velvet for dress boots, or waterproof fabric for rain boots. Old towels can also be repurposed for extra absorbency.
- Stuffing Alternatives: If polyester fiberfill isn’t available, consider using shredded old t-shirts, plastic grocery bags (a fantastic way to recycle!), or even uncooked rice or dried beans for added weight and stability (though be mindful of moisture). For a natural approach, cedar chips provide a pleasant scent and act as a moth deterrent.
- Aromatic Additions: Beyond lavender, explore other fragrant options. Dried rosemary, potpourri, or a few drops of cedarwood, eucalyptus, or tea tree essential oils can all contribute to a fresh-smelling closet while also offering antimicrobial benefits.
- No-Sew Options (for the less crafty): While this guide focuses on sewing, you can create simpler, temporary boot shapers by rolling up old magazines or cardboard tubes and covering them with a piece of fabric tied with ribbon. While less durable and customizable, it’s a quick fix!
- Personalized Touches: Add monograms, embroidery, or decorative patches to make your boot stuffers truly unique.
Before and After: The Transformative Power of Boot Stuffers
The difference these DIY boot stuffers make is truly remarkable. Before, our boots suffered from the inevitable slump, leading to irreversible creasing and a perpetually messy appearance in the closet.
Now, with our handmade boot stuffers, every pair stands tall and proud, perfectly preserving their shape and making the closet a joy to open. These simple DIY boot shapers work perfectly, transforming cluttered chaos into organized elegance!
Conclusion: Organize Smart, Live Beautifully
Crafting your own DIY boot stuffers is a win-win project. You save money, get to exercise your creativity, contribute to sustainable living by repurposing materials, and most importantly, keep your valuable boots in pristine condition. It’s a small change that yields big results in terms of closet organization, boot longevity, and even the ambiance of your space. So, gather your materials, fire up your sewing machine, and give your boots the upright, aromatic care they deserve. Your closet, and your wallet, will thank you!
P.S. If you do decide to buy your own boot stuffers, these are indeed quite charming!