
DIY Fireplace Tools Makeover: How to Paint Your Fire Poker Set with Heat-Resistant Paint
There’s something incredibly satisfying about transforming a forgotten item into a functional piece that not only serves its purpose but also enhances your home’s aesthetic. Fireplace tools, often overlooked, can become worn, dated, or simply no longer match your evolving decor. Today, we’re diving into a remarkably simple yet impactful DIY project: giving your old fireplace poker set a stunning new lease on life with a fresh coat of special, heat-resistant paint. Whether your current set is tarnished brass, chipped metal, or just a little lackluster, prepare to witness a dramatic before-and-after that proves a little paint can go a very long way.
Imagine your hearth, the cozy heart of your home, adorned with sleek, modern tools that complement its beauty. This isn’t just about painting; it’s about reclaiming, refreshing, and customizing. Our mission is to guide you through every step, ensuring a professional-looking finish that will make your fireplace accessories a stylish focal point once again. Get ready to learn how to paint fireplace tools effectively and economically.
Why Update Your Fireplace Tools? Extend Life and Enhance Style
The decision to update your fireplace tools extends beyond mere aesthetics; it’s a practical choice that offers numerous benefits. Often, a sturdy, well-made set of fireplace tools simply needs a cosmetic refresh, not a replacement. By choosing to paint your fireplace poker set, you’re embracing sustainability by repurposing existing items, saving money on new purchases, and gaining the satisfaction of a DIY accomplishment. Old sets, particularly those with brass handles or a worn finish, can make an entire fireplace area feel dated. A fresh coat of heat-resistant paint can instantly modernize the look, transforming a relic into a contemporary accessory that seamlessly integrates with your home’s current style.
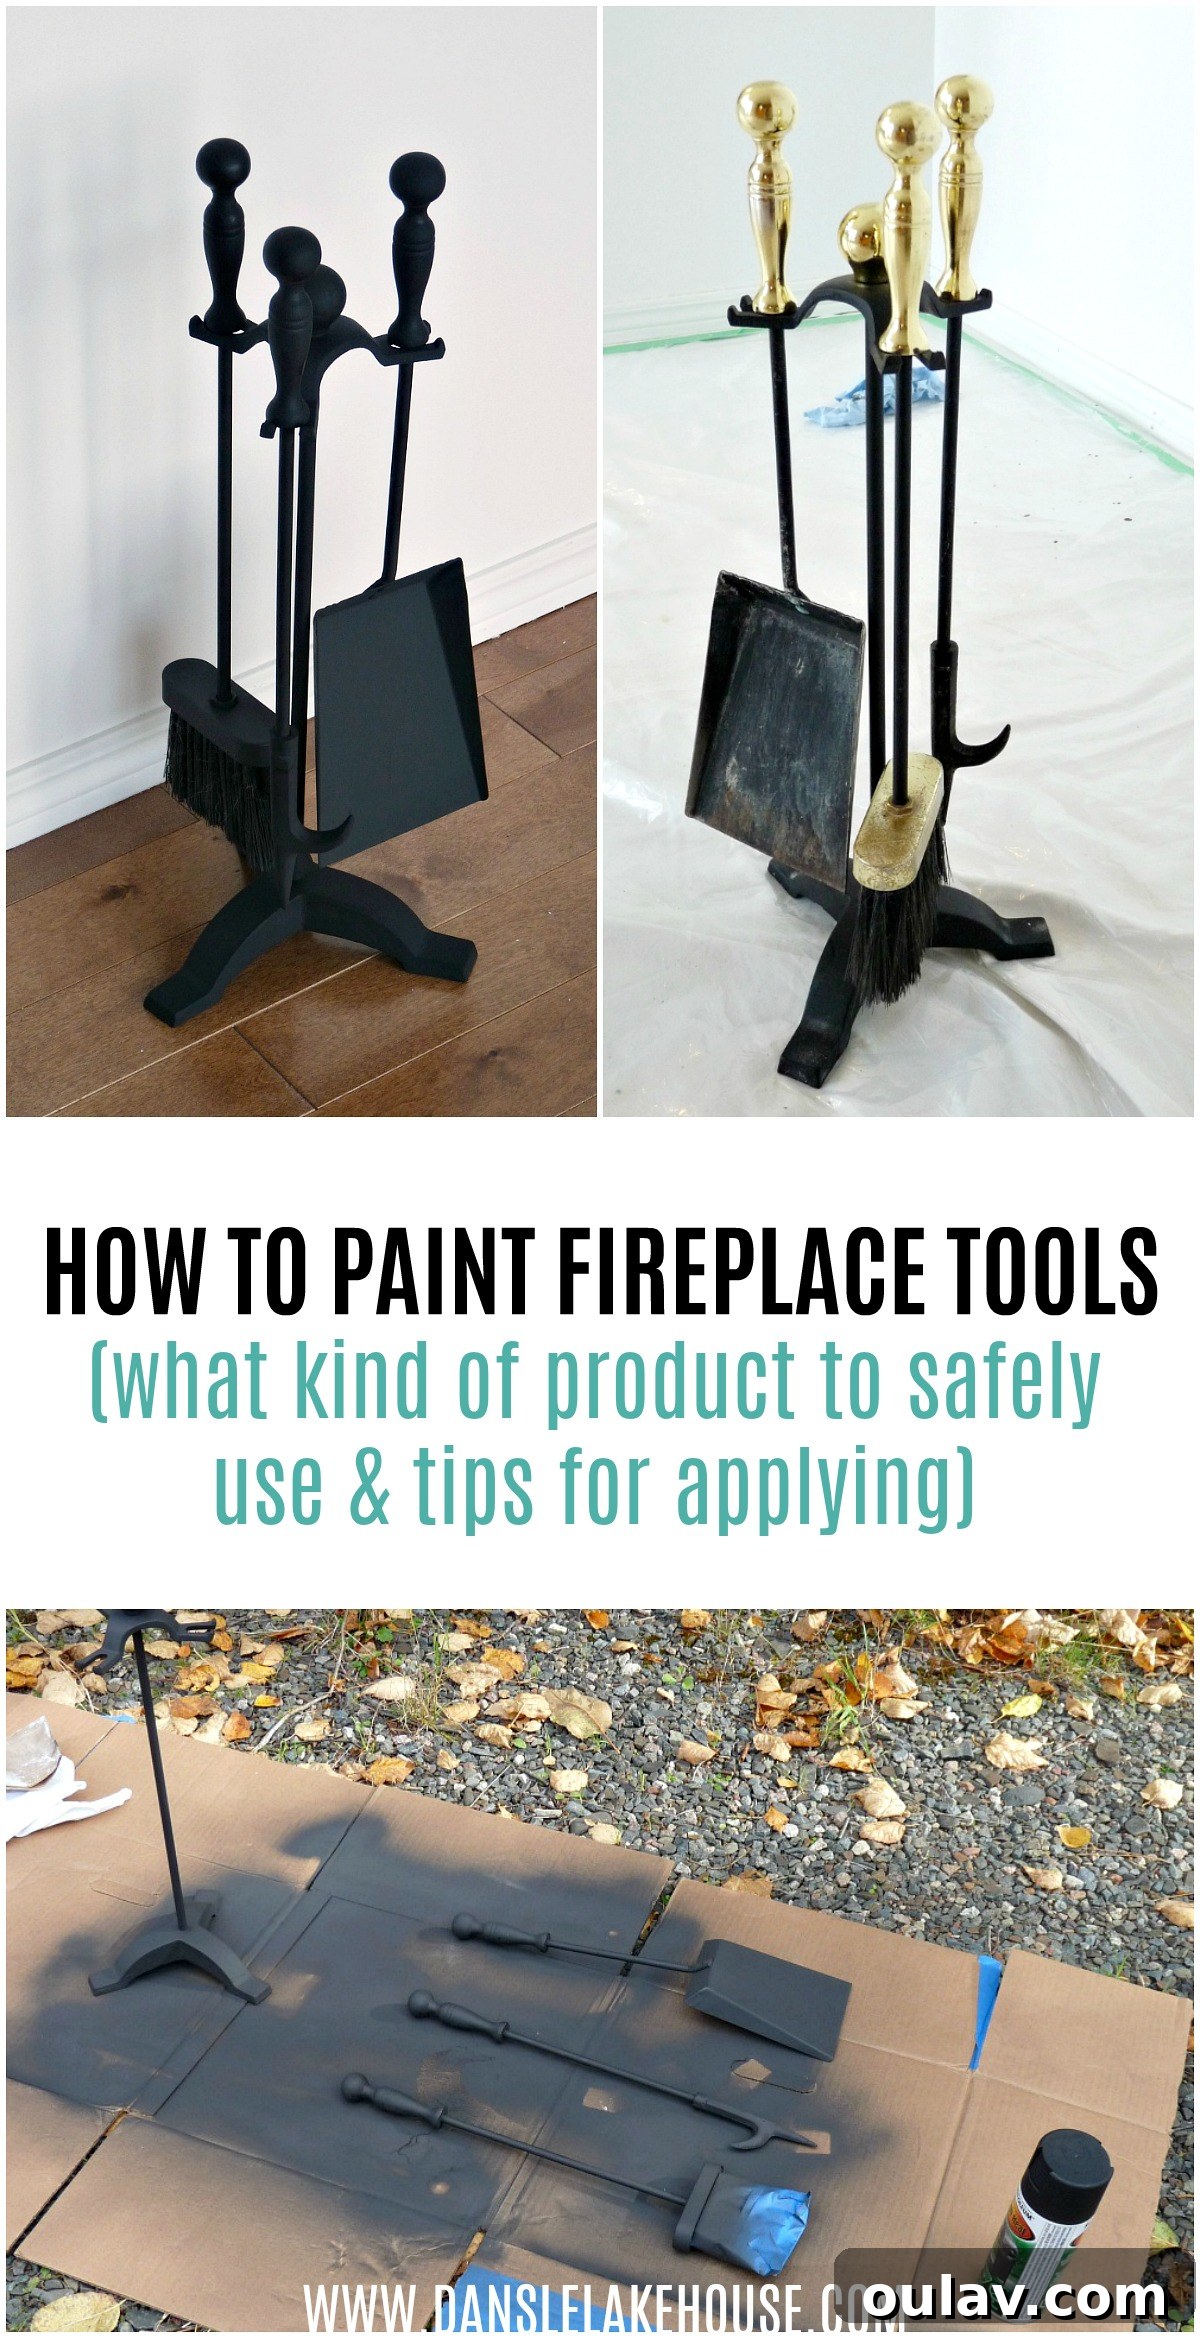
Our journey to revitalize this particular fire poker set began amidst a larger renovation at the lakehouse. Having recently spray painted the fireplace vents and doors, a seemingly neglected fire poker set left behind by the previous owners caught our attention. While we already possess a cherished, custom-welded set from my grandpa – a true heirloom – its unique stand, designed to also hold firewood, no longer fit our needs. With a convenient firewood cubby beside the fireplace, the wood storage function was redundant. This provided the perfect opportunity to refurbish the smaller, overlooked set, giving it a new purpose and a stylish overhaul.
The problem with the abandoned set was clear: brass handles and significant wear. As someone who doesn’t favor brass, this was an immediate call to action. But beyond the aesthetic mismatch, the tools themselves were in excellent structural condition, hinting at their potential for a remarkable transformation. This is the beauty of a DIY project – recognizing the underlying quality and applying a little effort to bring it back to life.
Choosing the Right Paint: The Power of Heat-Resistant Enamel
When you decide to paint fireplace tools, the type of paint you choose is paramount. Regular spray paint simply won’t withstand the intense heat radiated by an active fireplace, leading to peeling, chipping, and potentially harmful fumes. This is why a high-quality, heat-resistant enamel spray paint is non-negotiable. These specialized paints are formulated to endure temperatures up to 1200°F (650°C), making them ideal for fireplace accessories, grills, and other high-heat applications.
For this project, we opted for Rustoleum high heat spray paint in matte black. This particular brand is well-regarded for its durability and consistent finish, and its matte black hue offers a modern, sophisticated aesthetic that beautifully conceals imperfections and provides a sleek, updated look. While matte black is a popular choice for its ability to blend seamlessly and provide a contemporary feel, heat-resistant paints are also available in various metallic finishes and other colors, allowing for complete customization to match your personal style.
Gather Your Supplies: Preparation for a Flawless Finish
Before you begin the exciting part of painting, gathering all your materials is crucial for a smooth and efficient process. A well-prepared workspace and the right tools ensure both safety and a high-quality outcome. Here’s what you’ll need:
- Heat-Resistant Spray Paint: Such as Rustoleum High Heat Enamel (matte black or your preferred color).
- Mild Soapy Water: For initial cleaning.
- Scrub Brush: To remove stubborn ash, soot, and grime.
- Fine-Grit Sandpaper (150-220 grit): Essential for roughing up shiny surfaces (like brass) and removing rust, ensuring proper paint adhesion.
- Clean Rags or Towels: For drying the tools.
- Painter’s Tape: To protect parts you don’t want painted, such as brush bristles or delicate handles.
- Drop Cloth or Cardboard: To protect your work surface from overspray.
- Safety Glasses and Respirator Mask: Crucial for protecting your eyes and lungs from paint fumes and particles, especially when spray painting in a well-ventilated area.
- Gloves: To keep your hands clean.
Step-by-Step Guide: How to Paint Fireplace Tools Like a Pro
1. Preparation is Key: Cleaning and Sanding for Optimal Adhesion
The foundation of any successful paint job lies in thorough preparation. Skipping this step will result in a finish that peels, chips, and ultimately disappoints. Begin by taking your entire fireplace tool set – including the stand – and giving it a comprehensive clean. Use mild soapy water and a sturdy scrub brush to meticulously remove all traces of ash, soot, dust, and any built-up grime. Pay special attention to crevices and joints where debris can accumulate.
Once clean, the next critical step is sanding. For super shiny surfaces, like the original brass handles on our set, a light sanding with fine-grit sandpaper (150-220 grit) is essential. This creates a slightly abraded surface, giving the paint something to “grip” onto and ensuring superior adhesion. If your tools show any signs of rust, it is imperative to sand these areas down completely until the rust is gone. Rust beneath paint will continue to spread, eventually causing the paint to bubble and flake. After sanding, rinse all the tools and the stand with clean water to remove any sanding dust and soap residue. Allow everything to dry completely, ideally overnight, to ensure absolutely no moisture remains on the surface. A perfectly clean and dry surface is paramount for proper paint adhesion and a durable finish.
2. Taping and Protecting Your Work Area
Before you start spraying, protect any areas of your tools that you don’t want painted. For fireplace brushes, carefully tape off the bristles with painter’s tape. This ensures the brush remains functional and avoids stiffening the bristles with paint. If any parts of your handles have intricate details you wish to preserve, mask them off carefully as well. Next, move your setup to a well-ventilated outdoor area or a garage with open doors. Lay down a drop cloth or old cardboard to protect the ground from overspray. Remember to put on your safety glasses and respirator mask before proceeding.
3. Applying the Heat-Resistant Paint: The Art of Even Coats
Now comes the transformative part! Using your chosen heat-resistant spray paint, such as the matte black Rustoleum High Heat paint, begin applying thin, even coats. Hold the can approximately 8-12 inches away from the surface of the tools and use a steady, sweeping motion. Avoid holding the can in one spot for too long, as this can lead to drips and an uneven finish. The key is multiple thin coats rather than one thick one.
For our fireplace tools, we applied a couple of coats on each side. The beauty of this particular paint is its rapid drying time – typically half an hour to touch, and ready to handle in 1-2 hours. This quick turnaround allows for a very efficient DIY project. After applying the first coat to one side, wait the recommended drying time (approx. 30 minutes) before flipping the tools over and spraying the other side. Repeat this process for the second coat. This method ensures complete and even coverage on all surfaces. We used the same paint that transformed our fireplace vents and doors (you can see the whole fireplace makeover here), proving the versatility and impact of a consistent finish.
The Stunning Reveal: Modern and Refreshed Fireplace Tools
Once the paint has fully dried and cured – always refer to the specific instructions on your paint can for exact curing times, which can be up to 24-48 hours before full hardness is achieved – you’ll be amazed by the transformation. The old fireplace tool set now boasts a modern, refreshed look. The all-black matte paint finish dramatically updated the dated 1990s aesthetic of the original set, making it appear brand new. Even if your brush bristles were worn, replacement bristles are readily available, though fortunately, ours were still in good shape.
The satisfaction of updating this set, especially using leftover paint from a previous project, means this stunning makeover was essentially FREE. This is truly the best kind of DIY project – impactful, sustainable, and budget-friendly!
Integrating with Your Fireplace Decor: A Cohesive Look
The choice of a matte black finish for the fireplace tools was strategic. It allows the set to subtly disappear against the dark grey, newly painted stone of the fireplace. This intentional blending creates a clean backdrop, allowing other elements, such as artwork and decorative accessories, to truly pop and become the focal point. In an empty house that is still undergoing transformation, these small details contribute significantly to the overall vision. We’re eagerly anticipating the final decorating stages, especially hanging art on the planked walls flanking the fireplace, perhaps in white frames to create a striking contrast. Furthermore, figuring out the perfect narrow mantle decor will complete the cohesive design.
| You must ignore the disarray |
Maintenance Tips for Your Newly Painted Fireplace Tools
To ensure your beautifully painted fireplace tools remain in pristine condition for years to come, a little ongoing care goes a long way. After each use, allow the tools to cool completely before gently wiping them down with a soft cloth to remove any ash or soot. Avoid abrasive cleaners or harsh scrubbing pads, as these can scratch the painted surface. If you notice any minor scuffs or chips over time, a quick touch-up with your leftover heat-resistant spray paint can easily restore their flawless appearance. Storing the tools away from direct contact with rough surfaces when not in use can also help preserve their finish.
The Sustainable Choice: Budget-Friendly and Eco-Conscious DIY
This DIY fireplace tool makeover is a testament to the power of repurposing and intelligent resourcefulness. By choosing to refresh an existing set rather than purchasing a new one, you’re not only saving money but also making an eco-conscious decision. Reducing waste and extending the life of household items contributes to a more sustainable lifestyle. The fact that this project utilized leftover paint from another major fireplace renovation makes it even more appealing, demonstrating how a little foresight can lead to significant savings and a cohesive design throughout your home.
Conclusion: Transform Your Hearth with a Simple Project
Transforming your old fireplace tools into a modern, stylish set is an incredibly rewarding and straightforward DIY project. With the right heat-resistant paint and a few hours of effort, you can significantly enhance the look of your entire fireplace area without breaking the bank. From tarnished brass to sleek matte black, the before-and-after difference is truly striking, proving that even the smallest details can make a monumental impact on your home’s aesthetic. So, gather your supplies, embrace the DIY spirit, and give your fireplace tools the stunning makeover they deserve!
We partnered with Rustoleum to update the fireplace vents and doors and were so pleased with the quality of the paint (and the smart, matte black finish) that we tackled this as a bonus project with leftover paint. We were not prompted or encouraged to provide a positive review of Rustoleum high heat enamel paint; our positive experience was entirely organic.