
Get ready to transform your dining experience! I’m thrilled to share a simple yet incredibly impactful DIY project that brings a touch of modern elegance to any setting: a custom-dyed doily table runner. Forget everything you thought you knew about doilies; this project will prove they are far from outdated. With a splash of vibrant color, these charming lace pieces can become the unexpected star of your tablescape, offering a unique blend of vintage appeal and contemporary flair. Perfect for adding a personalized touch to seasonal decor, special occasions, or just brightening up your everyday dining with a unique handmade element.


Modern Charm: DIY Dyed Doily Table Runner for a Stunning Tablescape
Doilies often evoke images of antique heirlooms or grandma’s delicate lace, and truth be told, I was never their biggest fan. While I appreciate the intricate craftsmanship of pieces like my framed Hungarian embroidery, the traditional white doily didn’t quite pique my interest for modern home decor. That is, until a simple question from my mom sparked an idea that completely changed my perspective: “I wonder how easily we could dye doilies?” Hearing that word – “dye” – instantly opened up a world of possibilities, especially when the captivating color teal popped into my head!
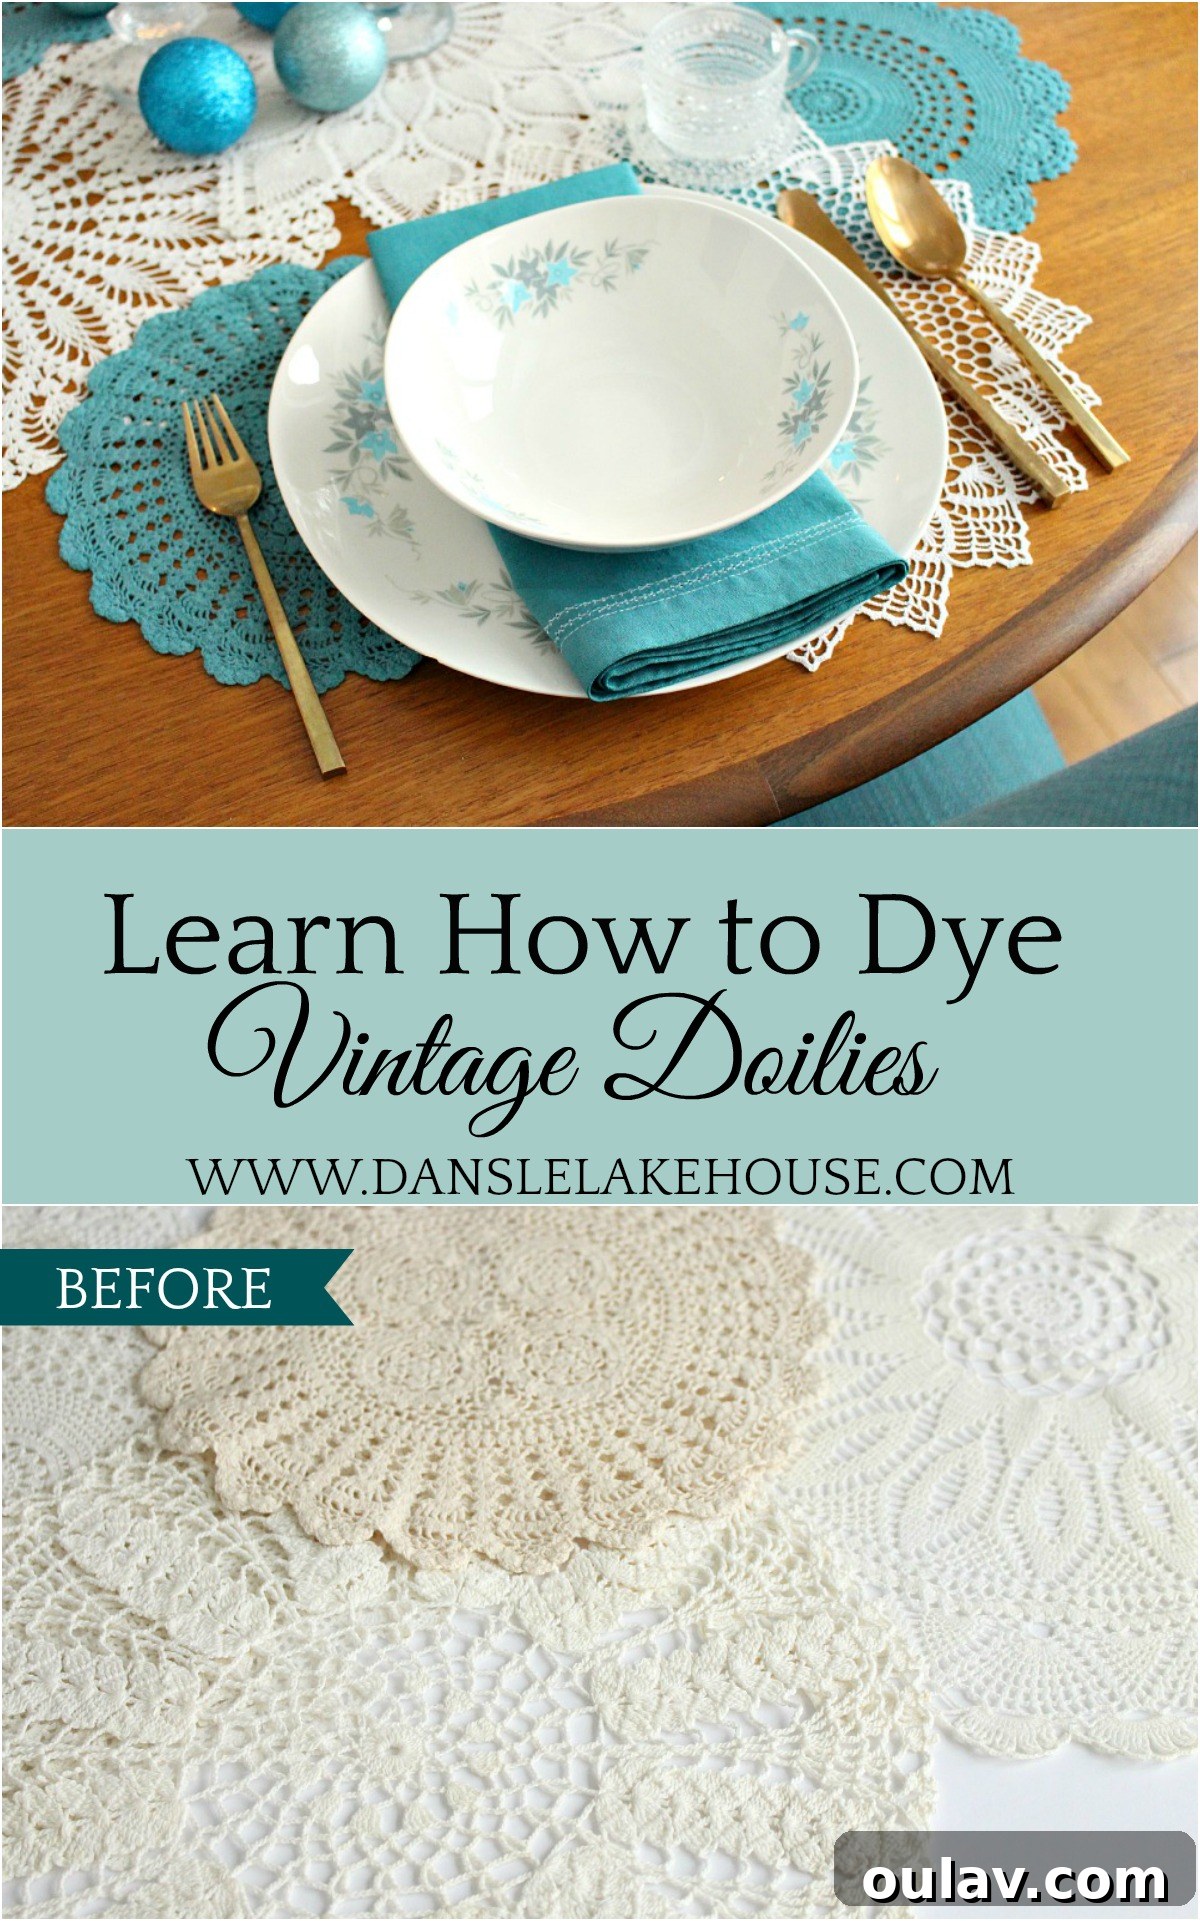
The concept of transforming these traditional pieces with vibrant, unexpected colors was revolutionary to me. This simple suggestion turned into an exciting DIY adventure. Luckily, my Mummu (grandmother) had an incredible treasure trove: a stash of about 100 doilies in every imaginable size and shade, just waiting for a new life. This discovery provided the perfect opportunity to experiment with doily dyeing and create an effortlessly chic DIY doily table runner. The results were truly astonishing, proving that a little color can completely redefine an item’s aesthetic and inject new life into classic pieces. Below, you can see a glimpse of the doilies in their original, un-dyed state, ready for their colorful transformation:

For my initial experiment, I carefully selected five doilies to dye, along with some coordinating napkins, right in my home washing machine. The entire process was surprisingly straightforward and yielded beautiful, custom-colored textiles with minimal effort. This method offers an incredible way to personalize your decor, allowing you to create unique pieces that perfectly match your aesthetic without complex techniques or specialized equipment. It’s an accessible craft for anyone looking to add a personalized touch to their home.

Craft Your Own: Supplies for Your DIY Doily Table Runner
Ready to embark on your own doily dyeing adventure? This project is incredibly rewarding and requires just a few basic items. With these readily available supplies, you’ll be well on your way to creating a stunning and unique table runner that will impress your guests and elevate your home decor. Paying close attention to the types of doilies you choose can significantly impact your dyeing results, so let’s delve into what you’ll need.
Essential Supplies for Doily Dyeing:
- White or Cream Doilies: These are the foundation of your project. You can find them at thrift stores, yard sales, antique shops, Etsy, or even readily available on Amazon. The more doilies you have, the longer and fuller your runner can be. Crucially, natural fibers like cotton, linen, rayon, or ramie will absorb dye much better and more evenly than synthetic materials. Aim for at least 5-10 doilies for a decent-sized runner, varying sizes can add visual interest.
- Rit Dye (Teal or your preferred color): A reliable fabric dye is absolutely key for vibrant results. Rit Dye is widely available and comes in a vast array of colors, allowing for endless creative possibilities. Choose a color that complements your existing decor, sets the mood for a specific season, or simply sparks joy! Consider having a second bottle on hand if you’re aiming for very dark or intense hues.
- 1 Cup Table Salt: This common household item plays a vital role in the dyeing process. Salt acts as a dye fixative, helping the dye absorb more evenly and deeply into natural fibers, resulting in richer, longer-lasting colors that are less prone to fading. Don’t skip this inexpensive but crucial step for the best possible outcome.
- Washing Machine: Your trusty washing machine will do most of the heavy lifting for this dyeing method, ensuring even saturation and thorough rinsing with minimal manual effort.
- Bleach (for machine cleaning afterwards): Essential for cleaning your washing machine after the dyeing process. Running an empty cycle with bleach will prevent any dye residue from transferring to future laundry loads, safeguarding your clothes.
Selecting the Perfect Doilies for Machine Dyeing
Not all doilies are created equal when it comes to machine dyeing. To ensure the best possible outcome and protect your precious lace, consider these tips carefully when selecting your doilies:
- **Fabric Composition is Key:** This is perhaps the most important factor. Always opt for doilies made from natural fibers such as cotton, linen, rayon, or ramie. These materials readily accept fabric dyes, yielding vibrant and consistent colors. Synthetic fibers like polyester, acrylic, or nylon, on the other hand, do not absorb traditional fabric dyes well and may result in patchy, very light, or non-existent coloring. Always check the label if possible, or if you’re unsure, perform a small burn test on a discrete thread (natural fibers will turn to ash, synthetics will melt).
- **Pattern and Density Matters:** Machine dyeing involves agitation and hot water, which can be harsh on delicate lace. Choose doilies with a more dense weave or a less intricate, frilly pattern. These will be more robust and significantly less prone to stretching, tearing, tangling, or damage during the washing cycle. Very fine, open-work doilies with intricate, loosely stitched patterns are generally better suited for a gentler hand-dyeing method.
- **Assess Their Condition:** Before you begin, thoroughly inspect doilies for any existing damage. Look for loose threads, small holes, tears, or stubborn stains that may not come out even with pre-washing. Remember, dyeing will often highlight imperfections, so starting with doilies in good, sound condition will yield the most professional-looking results.
- **Consider Sentimental Value:** If you have doilies with significant sentimental value or irreplaceable heirloom pieces, it’s always safer to consider hand-dyeing them instead of using the machine. The gentle, controlled environment of hand-dyeing minimizes the risk of damage, ensuring these treasured pieces remain intact and beautiful for years to come.
Step-by-Step Guide: How to Dye Doilies in Your Washing Machine
Dyeing doilies in the washing machine is a convenient and effective method for achieving beautiful, even colors with minimal fuss. Follow these detailed steps carefully to ensure a successful and vibrant outcome, and to protect your machine:
- **Prepare Your Doilies:** Before introducing them to the dye bath, ensure your doilies are clean and free of any sizing, fabric softeners, or finishes that might repel the dye. Pre-wash them if necessary and let them air dry. While the washing machine is filling, soak your dry doilies thoroughly in hot water. This ensures they are completely saturated before hitting the dye, which is crucial for helping the dye absorb evenly and preventing unsightly splotches or uneven coloring. Set them aside briefly.
- **Set Up the Washing Machine:** Select the hottest water setting available on your washing machine. For load size, choose a “small load” or “gentle cycle” setting to prevent excessive agitation that could harm delicate doilies. Allow the machine to fill completely with this hot water. The hot water is absolutely crucial for opening up the fabric fibers, allowing the dye to penetrate deeply and bond effectively.
- **Add Salt and Dissolve:** Once the machine tub is full of hot water, add one cup of regular table salt. Close the lid and allow the machine to agitate for approximately one to two minutes to ensure the salt fully dissolves into the hot water. As previously mentioned, salt acts as a vital dye fixative, particularly for cotton and other natural fibers, promoting richer, more permanent colors.
- **Introduce the Dye:** Carefully pour one full bottle of Rit Dye (or your chosen brand and color) directly into the agitated, salt-infused hot water in the washing machine. Close the lid again and let the machine agitate for approximately one minute. This step ensures the dye is thoroughly dispersed and mixed into the water, creating a uniform dye bath before your doilies are added.
- **Add the Wet Doilies:** Open the lid and carefully place your pre-soaked, wet doilies into the dye bath. It’s important to ensure they are unfolded and not bunched up, allowing maximum surface area contact with the dye. For this particular project, I also added a few coordinating napkins to dye alongside the doilies, adding to the cohesive look of the tablescape. For reference, the total weight of my fabric (doilies and napkins) was about one pound. While half a bottle of dye might suffice for very light or pastel shades, I highly recommend using a full bottle, or even doubling the dye quantity, for achieving bright, dark, or more intense, saturated colors.
- **Agitation and Color Development (Customizable):** Allow the machine to agitate on your chosen cycle. For subtle color variations and a beautiful gradient of shades, as I desired, I let the machine agitate for seven minutes, then carefully removed one doily. I rinsed it immediately under cold running water until the water ran clear, then gently hung it to dry. I then re-set the machine to continue agitating and repeated this process every seven minutes, removing another doily each time. This technique allows you to achieve a beautiful gradient of shades from a single dye bath. If you prefer a uniform, deeper color for all your doilies, you can simply leave all of them in the dye bath for the entire duration of the cycle. I kept re-setting the machine to ensure continuous agitation of the dye bath. Achieving the deepest, richest hue for my project typically took about 30-45 minutes in total.
- **Final Rinse and Dry:** Once your desired shades are achieved, allow the washing machine to complete its full cycle, including rinse and spin. This final rinse helps remove any excess, unabsorbed dye. After the cycle finishes, promptly remove the doilies and napkins. To maintain their shape, gently hang them to air dry completely or lay them flat on a clean surface. Avoid direct prolonged sunlight during drying as this can sometimes cause colors to fade.
- **Crucial Machine Cleaning:** This is a vital step! To prevent any residual dye from staining your next laundry load, it is imperative to thoroughly clean your washing machine. Run an empty cycle using the hottest water setting and a few cups of household bleach (or a commercial washing machine cleaner). Use the largest load setting to ensure the entire drum, agitator, and rinse components are completely flushed and cleaned. You might even wipe down the inside of the drum with a bleach solution for extra assurance.

Post-Dyeing Care: Restoring Your Doilies to Perfection
After their adventurous journey through the washing machine and the dyeing process, your newly colored doilies might feel a little stiffer than usual or show slight puckering or wrinkling due to the agitation and hot water. Don’t worry, this is a completely normal occurrence and is easily remedied with a little care and attention!
I was pleasantly surprised by how well my doilies held up during the machine dyeing, but some did develop minor puckers or lost a bit of their crisp flatness. To restore them to their original, beautiful flat shape and delicate drape, simply mist them lightly with clean water. Then, using a warm iron with a steam setting, gently press each doily flat. The steam helps relax the fibers, allowing you to carefully coax them back into perfect form. During this pressing process, I observed no dye transfer to my iron or ironing board, which confirmed that the dye had been properly set and rinsed. Not only did the doilies regain their ideal shape, but they also softened considerably, feeling just as delicate and lovely as they did before their colorful transformation. Below, you can see a close-up comparison of a doily, illustrating the remarkable difference a simple ironing step can make in perfecting its appearance after dyeing:


Assembling Your Stunning DIY Doily Table Runner
Creating the table runner itself is perhaps the easiest and most creatively fulfilling part of this entire project. There are several versatile ways to assemble your doilies, depending on the specific look you want to achieve, your desired level of permanence, and your overall commitment to the design.
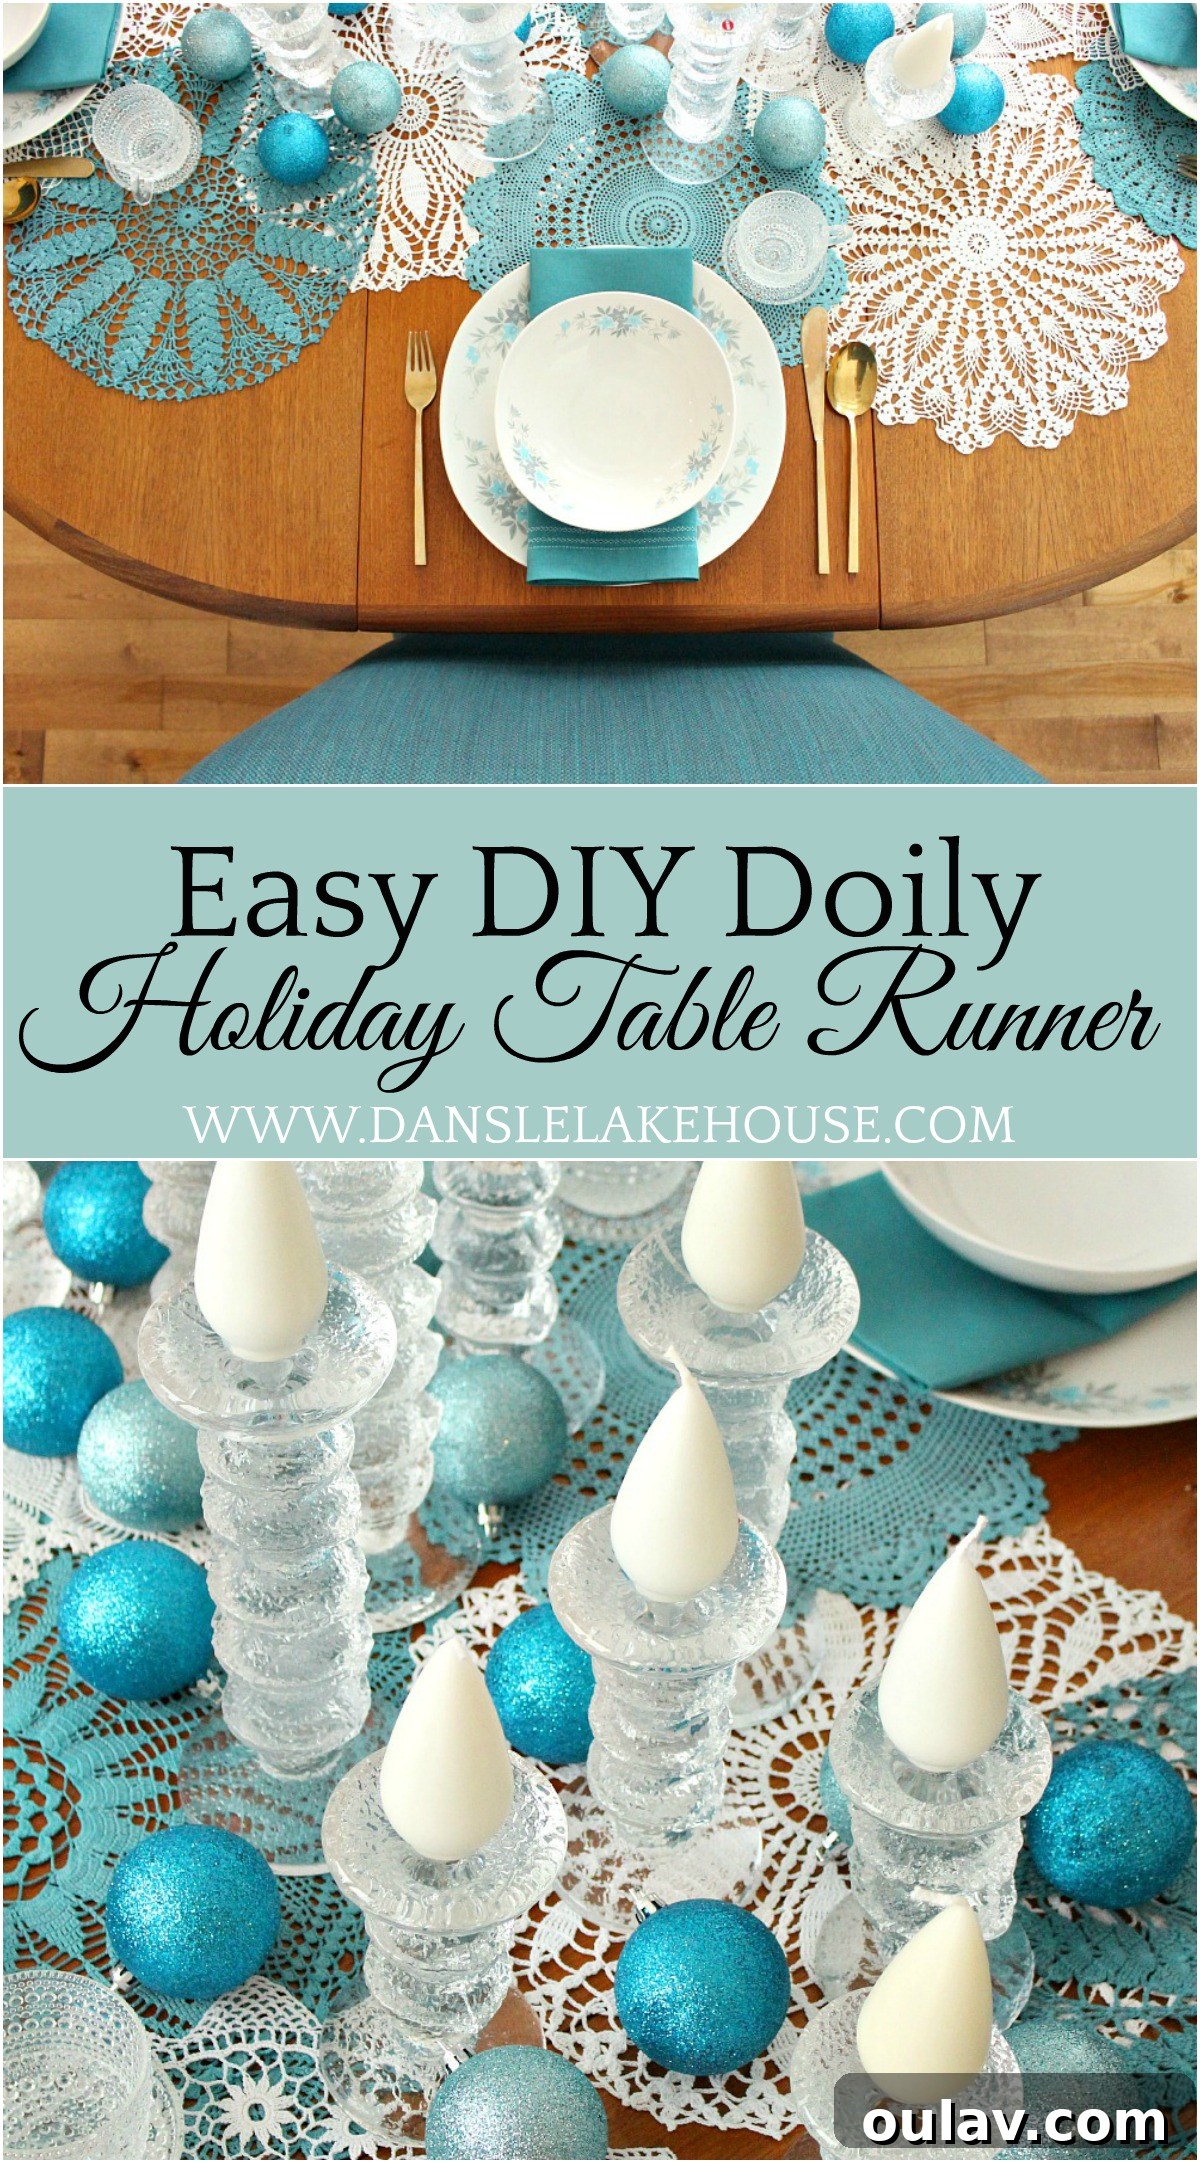
- **Simple Layering (My Preferred Method):** For an effortlessly chic, versatile, and non-committal look, simply layer your newly dyed doilies directly onto your dining table. I chose a captivating combination of my newly dyed teal doilies and crisp white ones, carefully selecting patterns that reminded me of delicate snowflakes to enhance my wintry tablescape theme. This layering method allows for incredibly easy rearrangement, quick seasonal changes, and no permanent commitment. You can spread them out to create a wider, more expansive runner, or layer them more densely for a narrow, intricate path down the center of your table. The beauty of this approach is its fluidity and the ability to adapt to any mood or occasion.
- **Gently Stitched Runner:** For a slightly more permanent and structured table runner, you could gently stitch the doilies together at their overlapping points. Use a needle and thread that either matches the doily color or is transparent to subtly secure them where they touch. This creates a cohesive, single piece that can be easily rolled up and stored when not in use, without losing its arrangement. This method is ideal if you want to reuse the exact design multiple times.
- **Sewn onto a Base Fabric:** For the ultimate in durability, a defined shape, and a professional finish, consider sewing your doilies onto a contrasting or complementary piece of base fabric. This could be a plain linen table runner, a solid-colored tablecloth, or even a piece of burlap or canvas. This provides a sturdy foundation, ensures the doilies stay perfectly in place, and allows you to create a precise, intricate design with confidence. This option is great for high-traffic tables or for a runner you intend to use for many years.
The inherent beauty of the layered approach, which I favor, is its unparalleled adaptability. When the season changes, or you simply desire a fresh new look for your home, you can easily pack up the doilies, or even choose to re-dye them in new colors – think warm autumn hues, vibrant spring pastels, or bold summer shades. This DIY doily table runner is not just a one-time project; it’s a flexible, evolving decor element that can gracefully adapt and transform with your personal style and the ever-changing seasons, offering endless creative possibilities.
Crafting a Cohesive Wintry Tablescape with Your New Runner
With your beautiful DIY dyed doily table runner as the undeniable centerpiece, it’s time to complete your tablescape, weaving together various elements to create a harmonious and inviting dining experience. The runner provides a wonderful foundation, adding essential texture, a striking focal point, and a personalized touch that ties every other piece together. For my specific wintry theme, I meticulously complemented the cool teal and crisp white doilies with a thoughtful mix of vintage and modern elements, resulting in a look that felt both comfortably nostalgic and utterly contemporary, perfect for the holiday season or any winter gathering.
- **Vintage Plates:** Incorporating vintage plates, perhaps with a subtle pattern or a timeless design, added an immediate layer of history, charm, and character to the table. Their classic aesthetic beautifully contrasted with the modern vibrancy of the teal doilies, creating a rich visual dialogue.
- **Matching Dyed Napkins:** The coordinating dyed napkins, which I skillfully created alongside the doilies in the same dye bath, brought a profound sense of unity and thoughtful detail to each individual place setting. This seemingly small touch significantly elevates the overall aesthetic, making the entire setup feel cohesive, curated, and wonderfully personalized.
- **Iittala Festivo Candle Holders:** My cherished collection of Iittala Festivo candle holders added a touch of iconic minimalist Scandinavian design. Their characteristic icy, textured glass perfectly complemented the wintry theme and, when lit, cast a warm, flickering, inviting glow that instantly enhanced the ambiance.
- **Iittala Kastehelmi Mulled Wine Cups:** These exquisite “dew drops” cups from Iittala introduced another subtle yet captivating layer of texture and elegance. Their unique design makes them ideal for serving festive beverages like mulled wine or hot cocoa, adding to the sensory experience of the tablescape.
- **Glittering Christmas Balls:** A thoughtful scattering of my glittering Christmas balls throughout the runner added a touch of festive sparkle and enchantment. These ornaments beautifully echoed the delicate, snowflake-like patterns of the doilies, creating a magical, cohesive visual narrative.
- **Vintage Bronze Flatware:** To strategically introduce warmth and depth to the predominantly cool wintry palette, I carefully incorporated my collection of vintage bronze flatware. The rich metallic sheen and antique finish provided a stunning, sophisticated contrast to the teal and white, grounding the entire tablescape.
The beautiful synergy of these carefully chosen elements culminated in a balanced, inviting, and truly memorable tablescape that felt both sophisticated and incredibly cozy. This entire project has genuinely opened my eyes to the immense, untapped potential of doilies as a modern decor element. I’m now completely enamored with the idea of dyeing them in even more colors – perhaps a brighter, more playful aqua, a fresh and serene mint, or a vibrant and cheerful coral – for different seasonal displays and celebratory occasions. The possibilities for creative expression are truly endless, inviting you to experiment and personalize your own home decor.


Beyond the Table: Embracing Modern Doily Decor
If you’re still skeptical about the remarkable versatility and undeniable modern appeal of doilies, I wholeheartedly encourage you to think beyond the dining table! Doilies, especially when revitalized with color, can be ingeniously incorporated into a vast array of home decor projects, instantly adding texture, unique charm, and a touch of bespoke handmade elegance to any space. For another innovative and stylish way to utilize these beautiful pieces, be sure to check out my DIY doily pillow project. It serves as a fantastic example of how a simple, humble doily can be completely transformed into a chic, stylish, and thoroughly contemporary accent for your living space, proving that with just a little creativity and a fresh perspective, these lace circles can achieve surprising decorative impact. Beyond pillows and runners, consider framing them as intricate wall art, weaving them into bohemian dreamcatchers, creating charming garland decorations, using them as elegant embellishments for clothing or bags, crafting unique gift wrapping accents, or even integrating them into mixed-media art projects. The only true limit is your imagination and willingness to experiment!
Frequently Asked Questions About Doily Dyeing & Modern Decor
To help you on your doily dyeing journey, here are some common questions and their answers:
- Q: Can I hand dye doilies instead of using a washing machine?
- A: Absolutely! Hand dyeing is an excellent and often preferred option, especially for very delicate, intricately patterned, or sentimental doilies. It gives you much more control over the agitation, saturation, and color intensity. To hand dye, simply follow the dye manufacturer’s instructions, which typically involve preparing a large bucket or tub with hot water, dye, and salt, then gently submerging and stirring the doilies until the desired shade is achieved. Remember to wear gloves to protect your hands!
- Q: What if my doilies are made of synthetic material?
- A: Doilies made from synthetic materials like polyester, acrylic, or nylon generally do not take natural fiber dyes (like most Rit Dyes) well. For successful dyeing of synthetics, you would need a specialized dye specifically designed for synthetic fabrics, such as Rit DyeMore. Always try to check the doily’s material composition first. If you’re unsure, it’s wise to test a small, inconspicuous area or a single less-valued doily before committing to the entire batch.
- Q: How can I prevent the dye from bleeding after washing?
- A: Thorough rinsing is the most crucial step to prevent dye bleeding. After the final dye bath and machine cycle, ensure the doilies are rinsed under cold running water until the water runs completely clear. Additionally, you can use a dye fixative product (such as Rit Dye Fixative) after dyeing and before the final rinse. This helps to chemically lock in the color to the fabric fibers, significantly minimizing bleeding, especially for darker or more vibrant shades.
- Q: How do I care for my newly dyed doilies and table runner?
- A: For optimal longevity of color and to maintain the integrity of your dyed doilies, it’s best to hand wash them in cold water with a mild, color-safe detergent. If machine washing, use a very gentle cycle with cold water and wash with like colors to prevent any potential slight color transfer. Air dry them flat on a clean towel or hang them gently to maintain their shape and prevent stretching. Avoid drying them in direct, prolonged sunlight, as this can cause colors to fade over time.
- Q: What other DIY projects can I make with dyed doilies?
- A: The creative possibilities with dyed doilies are truly endless! Beyond stunning table runners and throw pillows, they can be used for unique wall art (framed individually or arranged in a collage), incorporated into whimsical dreamcatchers, strung together to create charming garland decorations for parties or nurseries, used as elegant embellishments for clothing, bags, or accessories, crafted into unique and personalized gift wrapping accents, or even integrated into mixed-media art projects and scrapbooking. Let your imagination run wild!
I sincerely hope you’ve been thoroughly inspired by this DIY dyed doily table runner project! It’s a true testament to how a little creativity, a willingness to experiment, and a splash of vibrant color can utterly transform ordinary items into extraordinary, personalized decorative pieces for your home. What do you think of this modern, refreshing take on vintage doilies? I’d love to hear your thoughts and your own creative doily ideas in the comments below – let’s inspire each other!