
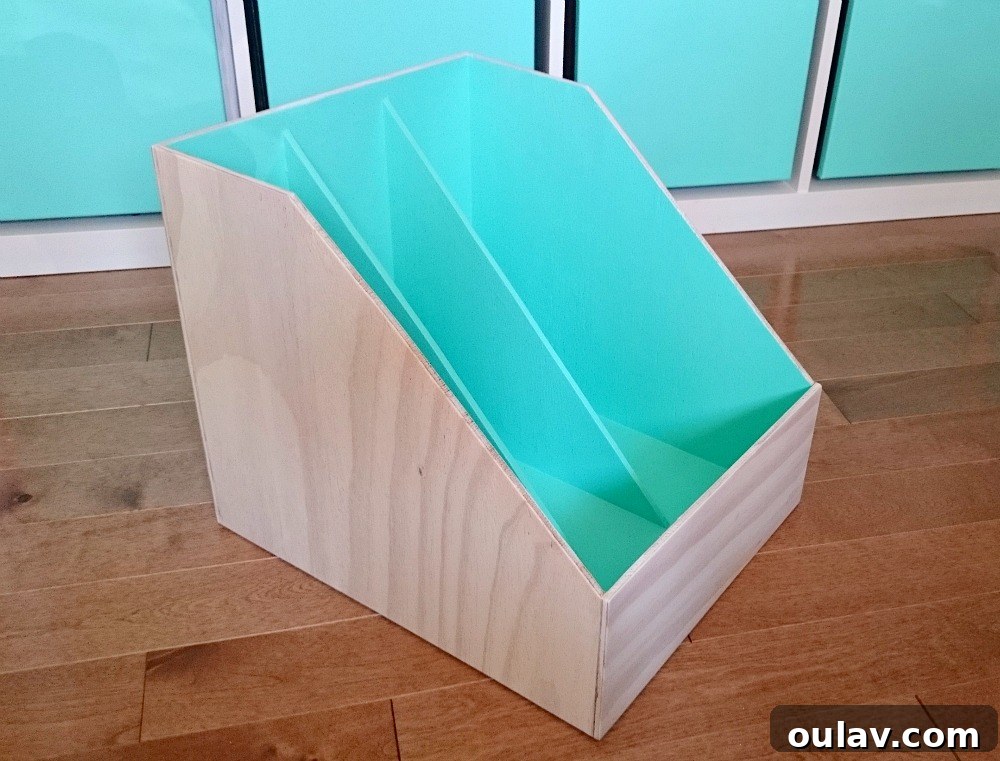
Elevate Your Home Office: DIY Plywood Magazine Files for Seamless IKEA Expedit Integration
Are you looking for a stylish, functional, and perfectly tailored way to organize your growing collection of magazines, notebooks, and important documents? If you own an IKEA Expedit (or the newer Kallax) shelving unit, you know its incredible versatility. However, finding storage solutions that fit precisely and complement your aesthetic can be a challenge. That’s where custom DIY plywood magazine files come in! Join us as we share our comprehensive guide on how we constructed these beautiful and durable magazine holders, designed to integrate flawlessly with our IKEA Expedit unit, transforming a chaotic space into a picture of organized elegance. Discover how simple woodworking techniques can lead to stunning, personalized home organization.
The Quest for Order: Taming the Home Office Chaos and Clutter
For far too long, our home office has been a testament to organized chaos, leaning heavily on the “chaos” side. It’s gotten to the point where readers have genuinely wondered if a home office even existed in our house! While you might have caught glimpses of the closet transformed into a vibrant aqua nook and my IKEA Expedit Hack 2.0, the main desk area often remained a bustling workshop, especially since our Etsy shop truly took off. After unearthing my desk from beneath layers of projects and spending considerable time making the office presentable, it quickly reverted to its creative clutter. It became clear that the bookcase area, particularly our beloved IKEA Expedit shelving unit, was the ideal starting point for a major organizational overhaul.
My husband and I had previously undertaken a simpler Expedit hack, successfully concealing photo albums and unsightly binders on the bottom row. However, the fourth row remained a stubborn stronghold of disarray, overflowing with a jumble of mismatched, painted, and unpainted magazine files, alongside various coil-bound course packs. This visual clutter was a constant reminder that our organization efforts were far from complete. It was time to find a cohesive, aesthetic, and functional solution that would bring lasting order to this perpetually messy corner of our home office.
The Decision to DIY: Why Custom Plywood Magazine Holders are Superior for Organization
Initially, I envisioned needing fifteen identical magazine files to bring true uniformity to the Expedit. I embarked on an extensive search for the perfect off-the-shelf solutions. What I encountered was a frustrating dichotomy: options were either prohibitively expensive, like the $15-a-piece teal files I admired online, or alarmingly flimsy, a common trait in some mass-produced options (yes, IKEA, we’re looking at you for basic files!). Neither extreme offered the value, durability, or aesthetic appeal I was seeking for a long-term home office storage solution.
After much deliberation, we decided that crafting our own magazine files from plywood was the most logical and satisfying path. This approach offered complete control over dimensions, materials, and finish, ensuring a perfect fit and robust construction. A last-minute revelation led us to rethink the quantity and size: instead of fifteen smaller files, we opted for five larger versions. This adjustment simplified the building process, saving time and creating a much cleaner, more streamlined look within the Expedit cubbies. Furthermore, it eliminated any concern about potential height discrepancies if we accidentally made some files taller than others, a common frustration with DIY projects. The resulting DIY plywood magazine files are a testament to this strategic shift – perfectly aligned, substantial, and incredibly effective for maintaining a tidy and stylish workspace.
We couldn’t be more thrilled with the outcome of these DIY plywood magazine files. Their custom fit, sturdy construction, and refined finish have brought a new level of order and sophistication to our home office, making it a more pleasant and productive space. If you’re struggling with magazine clutter and need bespoke storage, this tutorial offers a fantastic foundation. While you can certainly adapt the dimensions to suit your specific needs, we advise against making them excessively large, primarily due to the potential for them to become quite heavy when fully loaded, which could make them cumbersome to handle regularly. These custom Expedit bins are truly a game-changer!
Essential Supplies for Your DIY Plywood Magazine File Project
Before diving into construction, gather all your necessary tools and materials. Having everything ready ensures a smooth and efficient building process, allowing you to focus on the craftsmanship. Here’s a comprehensive list of what you’ll need to create your own custom magazine holders:
- 1/4″ Plywood: We specifically used Caribbea pine plywood for its attractive grain pattern and excellent workability. This particular thickness is crucial; it provides sufficient stability for holding numerous magazines without adding excessive bulk or weight to the finished files.
- Wood Glue: A high-quality, strong wood glue is paramount for creating durable, lasting joints. This ensures your magazine files can withstand the weight of their contents over time without coming apart.
- Wood Clamps: These are absolutely essential for holding the plywood pieces together firmly and applying consistent pressure while the wood glue dries. Proper clamping ensures tight, strong bonds and square corners.
- Table Saw: An indispensable tool for making precise, straight, and repetitive cuts. A table saw is ideal for accurately cutting the main rectangular panels that form the back, bottom, and sides of your magazine files.
- Band Saw (optional): Extremely useful for making the distinctive angled cuts on the front of the magazine files. While optional, a band saw offers greater control and cleaner results for these non-straight cuts. If you don’t have one, a jigsaw or even careful hand sawing with a coping saw can work, but may require more extensive sanding afterward.
- Sandpaper: You’ll need various grits of sandpaper (e.g., 80-120 grit for initial shaping, 150-220 grit for smoothing) to ensure all edges and surfaces are perfectly smooth before finishing.
- Paint/Varnish/Stain: To protect and beautify your plywood files. Your choice will depend on your desired aesthetic – whether you prefer a natural wood look with stain/varnish or a painted finish to match your decor.
- Hardware (Knobs or Pulls): These are both functional and decorative. They provide an easy way to pull the files out of the Expedit cubbies and add a personalized touch to your custom storage.
- Drill and Screws for Hardware: Necessary for securely attaching your chosen knobs or pulls to the front panels of the magazine files.
Step-by-Step Guide: How to Build Your Custom Plywood Magazine Files
Building these custom plywood magazine files is a rewarding project that combines precision woodworking with practical home organization. Follow these detailed steps to create your own bespoke storage solutions:
1. Design and Planning: Sketching Out Your Vision and Optimizing Cuts
Every successful woodworking project begins with a clear, thoughtful plan. Ours started, as many do, with a simple doodle – a rough sketch to visualize the overall design and to begin thinking about the critical dimensions. This initial drawing helps translate abstract ideas into tangible shapes and precise measurements. For materials, we decided on 1/4″ Caribbea pine plywood, which offers an attractive grain and excellent workability. This material is similar to what we used for our DIY floating IKEA credenza top, but we opted for a thinner gauge here, perfectly suited for magazine files where weight and bulk needed to be minimized. Once we had a solid concept and general size requirements for our custom Expedit storage bins, my husband utilized this fantastic online cut list tool. This resource is invaluable for optimizing plywood usage, minimizing waste, and accurately determining the exact number and dimensions of each piece required from a standard sheet of plywood. We’ve relied on it for other projects, such as our DIY plywood pantry, and it consistently streamlines the planning phase, ensuring efficient material use. While we tackled these files alongside another larger project, we estimate we used approximately one and a half sheets of plywood for the entire set of five large files. Careful planning at this stage ensures you have enough material and helps you make the most efficient, cost-effective cuts.
For those eager to replicate our specific dimensions for their own IKEA Expedit magazine storage, we’ve updated this post with even more precise cut list information, a valuable addition suggested by one of our helpful readers. Remember, while these dimensions work perfectly for our Expedit, they are entirely customizable to fit your unique storage needs or other shelving units you might have.
Here are all the meticulously cut pieces laid out for a single magazine file, perfectly prepped and ready for assembly, showcasing the detail that goes into a custom woodworking project:
2. Precision Cutting: Shaping Your Plywood Pieces for a Perfect Fit
With your cut list finalized, it’s time for the most critical step in woodworking: cutting the plywood. Accuracy here ensures a seamless assembly and a professional finish for your DIY magazine holders. My husband expertly used a table saw to achieve perfectly square and rectangular cuts for the main body panels of each magazine file. The table saw’s precision fence and powerful blade make quick work of these straight cuts, which form the sturdy back, bottom, and sides of the boxes. This tool is indispensable for achieving the clean, straight lines essential for a professional-looking project.
For the distinctive triangular front pieces, which give the magazine files their characteristic shape and allow for easy access to contents, a band saw proved incredibly useful. Its narrow blade allows for curved and angled cuts with greater control and less material waste. If a band saw isn’t available, a jigsaw can also achieve these angles, though it might require a bit more sanding afterward to smooth and refine the edges. Regardless of the tool used, safety is paramount during all cutting operations; always wear appropriate protective gear, such as safety glasses, and follow all tool safety guidelines to prevent accidents.
3. Assembly: Gluing and Clamping for Durability and Structure
With all pieces expertly cut, the assembly process can begin. My husband utilized an edge gluing technique, applying a generous and even amount of wood glue to both sides of each joint before clamping the boxes together. This meticulous approach ensures maximum adhesion and creates a robust, lasting bond that will withstand the demands of daily use. Proper clamping is absolutely crucial at this stage; it holds the pieces firmly in place while the glue cures, preventing any gaps and ensuring the structural integrity and squareness of the boxes. Once the main box structures were dry and secure, he then carefully glued the internal dividers into place. These dividers are integral for keeping magazines and documents upright and neatly separated, preventing them from slumping over. Without these dividers, these plywood boxes would also make excellent, simple storage bins for the Expedit, offering flexible storage for a variety of larger items.
During the gluing and clamping phase, we found ourselves in my husband’s dad’s woodworking shop. It was a productive environment, albeit one where our dog, Szuka, made new (and sometimes complicated) acquaintances with the local canine residents. She’s undeniably charming, but when other dogs are around, her playful energy can sometimes be a bit much! After a brief, adorable interlude with our furry friend, it was back to focusing on the magazine files, ensuring every joint was perfect.
4. Finishing Touches: Sanding, Staining, and Varnishing for Aesthetics
Once the glue had fully dried and the magazine files were structurally sound, it was time to move on to the crucial finishing steps. We meticulously sanded all surfaces and edges smooth, starting with a coarser grit and progressing to finer ones. This crucial step not only enhances the aesthetic appeal by removing imperfections but also prepares the plywood for optimal absorption of stain or paint, resulting in a professional-grade finish that feels smooth to the touch. Initially, I was strongly tempted to paint them a vibrant aqua, mirroring my consistent “everything turquoise!” mantra and the existing closet nook and hanging canvases (using a semi-gloss in this specific color). However, I found myself captivated by the natural, warm grain of the Caribbea pine. To preserve this beautiful texture while still incorporating my preferred color palette, I decided to paint only the insides of the files in the beloved turquoise. To prevent any paint bleed onto the external faces and maintain a crisp line, I carefully avoided painting the edges. While I adore the Caribbea grain, the natural yellowish hue often found in pine wasn’t quite my preference for the exterior. To counteract this and achieve a softer, more contemporary look, three coats of my favorite white stain were applied to the exterior. This process effectively toned down the yellow undertones, creating a muted, modern aesthetic while still allowing the subtle character of the wood grain to show through. The files looked promising even before the stain, showcasing the vibrant internal paint contrast:
Once the stain was completely dry and fully cured, I applied two coats of low-lustre varnish. This protective layer not only enhances the durability of the plywood and its finish, making it more resistant to wear and tear, but also adds a subtle sheen without being overly glossy. Crucially, I lightly scuff-sanded between coats of varnish. This important step creates a micro-abrasion on the surface, which allows the subsequent coat to adhere better, resulting in an exceptionally smoother, more uniform, and ultimately more durable finish that will stand the test of time.
5. Hardware Installation: Functional Elegance and Easy Access
After the varnish had fully cured, it was time to add the final functional and decorative elements to our DIY plywood magazine files: the hardware. You might recall my beautiful vintage hardware, which received a stunning makeover with a touch of rub ‘n buff, transforming them into elegant accents. We meticulously installed these pieces, ensuring they were perfectly centered on the front of each file for a balanced and professional appearance. To achieve such precise placement, we used a small metric bolt and washer as temporary guides, guaranteeing consistent positioning across all five files. This attention to detail in hardware installation not only elevates the overall aesthetic look of the magazine holders but also makes retrieving the files from the Expedit unit effortless, combining beauty with practicality.
6. Adding Protective Feet: Safeguarding Your Furniture and Enhancing Glide
To prevent any potential scratching or damage to our pristine white IKEA Expedit unit, particularly when sliding the files in and out, we added felt feet to the bottom of each magazine file. While the bottom surfaces of the plywood were sanded smooth, I’ve found through experience that white furniture finishes tend to show scuffs and marks more easily than the espresso finish we had previously. This small, yet thoughtful, addition of felt feet ensures the files glide smoothly and effortlessly in and out of the cubbies without leaving any unsightly marks or abrasions on the Expedit’s surface. Currently, we’re using individual felt pads, but I believe that two adhesive-backed felt strips applied along either long edge of the file bottoms would provide even better, more comprehensive protection and enhanced stability, distributing weight more evenly. It’s a minor upgrade I plan to make soon, further perfecting these custom storage solutions.
Living with Custom Storage: Durability, Practicality, and Aesthetic Integration
When you embark on a DIY project, especially one involving furniture or storage solutions, there’s always a lingering question about its longevity and how well it will hold up to daily use. So far, our DIY plywood magazine files have performed admirably, exceeding our expectations for durability and functionality. Of course, there’s always a slight chance that the construction might not perfectly bear the full weight of heavily packed magazines over many years, but we’ll certainly keep you updated on their long-term wear and tear. When filled to capacity, they are indeed a bit heavy, as anticipated with solid plywood construction, but they remain perfectly manageable to retrieve and replace from the Expedit cubbies. Frankly, I don’t constantly reference my old magazines – though I simply can’t bring myself to part with beloved issues of Domino or Style at Home, and my husband is equally guilty of hoarding his favorites. They primarily serve as cherished keepsakes and an aesthetically pleasing way to contain what would otherwise be visual clutter. When I’m home sick or in the early planning stages of a new project, I’ll take them all out for a leisurely leaf-through, drawing inspiration from their pages. But for the most part, they stay neatly put, providing a clean, organized look. If you’re someone who needs to access magazines frequently throughout your day, a single “mega file” might not be the most practical solution, and you might prefer smaller, individual files for easier, quicker access. For us, the balance of aesthetics, durability, and occasional use is absolutely perfect, proving the value of custom DIY solutions.
One small aesthetic detail that currently catches my eye is the difference in height and width between these new magazine files and the canvases I used for our previous Expedit hack. The files are slightly wider and taller, which creates a minor visual imbalance that, for a design enthusiast like myself, is noticeable. When time permits, I might consider redoing the Expedit hack with plywood pieces that perfectly match the new files’ dimensions to achieve a more cohesive and harmonious look, or perhaps I’ll simply grow accustomed to the change, as often happens with evolving home decor. Such are the delightful dilemmas and ongoing evolutions of home decorating and DIY projects!
Conclusion: Achieve Your Dream of Organized Style with DIY Plywood Magazine Holders
Crafting these DIY plywood magazine files has been an absolute game-changer for our home office. Not only have they provided a bespoke, perfectly fitting solution to a long-standing organization challenge, but they’ve also added a touch of personalized style and sophistication that off-the-shelf options simply couldn’t deliver. The satisfaction of building something so functional and beautiful with your own hands is truly immense, fostering a deeper connection with your living space. We hope this detailed tutorial inspires you to tackle your own storage dilemmas and embrace the rewarding journey of DIY. Whether you’re seeking to declutter an IKEA Expedit, enhance your home office aesthetics, or simply enjoy a fulfilling woodworking project, custom plywood magazine files offer an unbeatable combination of durability, perfect fit, and tailored design. Dive in, get creative, and enjoy the journey to a more organized, functional, and beautiful space that truly reflects your personal style!